Nếu server của bạn đang dùng HocVPS Script, hãy làm theo từng bước hướng dẫn này để cài đặt chứng chỉ SSL Let’s Encrypt miễn phí và được tự động gia hạn.
Let’s Encrypt là một nhà cung cấp chứng chỉ số SSL (Certificate Authority) hoàn toàn miễn phí, được nhiều cá nhân và tổ chức tin dùng và đặc biệt không giới hạn.
Trong bài viết này, mình sẽ hướng dẫn các bạn từng bước cài đặt chứng chỉ Let’s Encrypt trên server cài HocVPS Script (LEMP Server, CentOS 6 và 7). Nếu dùng shared hosting như Hawk Host hoặc StableHost, DreamHost, SiteGround thì mọi chuyện còn đơn giản hơn nhiều vì Let’s Encrypt đã được tích hợp sẵn trong cPanel, chỉ cần vài click là cài đặt thành công. Mời bạn tham khảo hướng dẫn cài đặt Let’s Encrypt trong cPanel.
Let’s Encrypt là chứng chỉ SSL loại Domain Validation tức là sau khi cài bạn sẽ có thanh ổ khoá màu xanh trên trình duyệt. Ngoài Let’s Encrypt còn có PositiveSSL của Comodo và Standard SSL DV của GoDaddy. cũng được rất nhiều người sử dụng.
Nếu cài xong mà thanh địa chỉ chưa hiện HTTPS màu xanh, hãy tham khảo bài Hướng dẫn cài đặt SSL “xanh hoàn hảo”
Nếu không nắm vững kiến thức kỹ thuật, hãy liên hệ sử dụng Dịch vụ Cài đặt SSL từ Học VPS.
Nội dung bài viết
1/ Cài đặt chứng chỉ Let’s Encrypt
1.2/ Phát hành chứng chỉ SSL Let’s Encrypt cho domain
3/ Cập nhật cấu hình trong Google Search Console và Analytics
4/ Tự động gia hạn Let’s Encrypt
1/ Cài đặt chứng chỉ Let’s Encrypt
1.1/ Cài đặt certbot
yum -y install certbot
1.2/ Phát hành chứng chỉ SSL Let’s Encrypt cho domain
Để phát hành chứng chỉ SSL Let’s Encrypt cho domain có rất nhiều cách, mình sẽ sử dụng option --standalone
# Stop Nginx
service nginx stop

# Issue SSL Let's Encrypt
certbot certonly --standalone
Chờ một lúc để Let’s Encrypt cài đặt những công cụ cần thiết. Sau đó bạn hãy nhập địa chỉ email, rồi nhấn phím Enter.

Chấp nhận quy định bằng cách nhập a, rồi nhấn tiếp Enter.
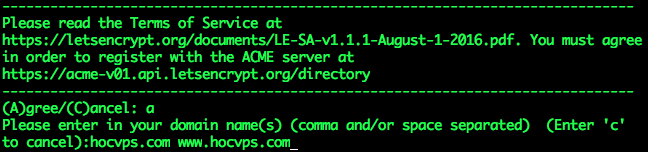
Tiếp theo bạn nhập tên miền sẽ sử dụng chứng chỉ SSL, rồi nhấn Enter. Bước này bạn chỉ nhập phiên bản non-www và www của 1 domain hoặc subdomain. Khi muốn thêm tên miền/subdomain khác bạn hãy xem hướng dẫn bên dưới.
Nếu không gặp vấn đề gì bạn sẽ gặp thông báo như bên dưới:
IMPORTANT NOTES:
 - Congratulations! Your certificate and chain have been saved at
 /etc/letsencrypt/live/hocvps.com/fullchain.pem. Your cert will
 expire on 2016-08-23. To obtain a new version of the certificate in
 the future, simply run Certbot again.
 - If you lose your account credentials, you can recover through
 e-mails sent to admin@hocvps.com.
 - Your account credentials have been saved in your Certbot
 configuration directory at /etc/letsencrypt. You should make a
 secure backup of this folder now. This configuration directory will
 also contain certificates and private keys obtained by Certbot so
 making regular backups of this folder is ideal.
 - If you like Certbot, please consider supporting our work by:

 Donating to ISRG / Let's Encrypt: https://letsencrypt.org/donate
 Donating to EFF: https://eff.org/donate-le
Lưu ý các thông tin mình bôi đỏ:
- /etc/letsencrypt/live/hocvps.com/: thư mục chứa các file chứng chỉ
- 2016-08-23: ngày hết hạn của chứng chỉ (90 ngày từ ngày cài)
Cài đặt chứng chỉ SSL Let’s Encrypt cho nhiều website
Nếu cần bổ sung thêm domain/subdomain muốn cài đặt Let’s Encrypt, bạn chỉ cần chạy lại lệnh bên dưới rồi nhập domain vào:
# Stop Nginx
service nginx stop

# Install Let's Encrypt
certbot certonly --standalone
Lúc này domain mới sẽ có thêm một thư mục riêng chứa file chứng chỉ cần thiết.
2/ Cấu hình Nginx
Sau khi có các file chứng chỉ, chúng ta sẽ chỉnh lại file cấu hình Nginx. Ví dụ tên miền của mình là hocvps.com thì file cấu hình sẽ có đường dẫn là /etc/nginx/conf.d/hocvps.com.conf
Khi làm bạn nhớ thay tương ứng hocvps.com bằng domain của bạn nhé.
Lưu ý: Chỉ cấu hình Nginx khi bạn đã phát hành thành công chứng chỉ SSL.
Tạo file DH parameters 2048 bit (tạo một lần duy nhất trên VPS)
mkdir /etc/nginx/ssl/
openssl dhparam 2048 -out /etc/nginx/ssl/dhparam.pem
Chỉnh sửa cấu hình domain bằng Nano Editor
nano /etc/nginx/conf.d/hocvps.com.conf
Cấu hình SSL xử lý các request
Trong block server { ... } thứ 2 điều chỉnh như sau:
+ Chuyển listen 80 default_server; thành listen 443 ssl default_server;
+ Sau dòng server_name hocvps.com; thêm đoạn cấu hình SSL:
	# SSL
	ssl_certificate /etc/letsencrypt/live/hocvps.com/fullchain.pem;
	ssl_certificate_key /etc/letsencrypt/live/hocvps.com/privkey.pem;
	ssl_protocols TLSv1 TLSv1.1 TLSv1.2;
	ssl_prefer_server_ciphers on;
	ssl_ciphers EECDH+CHACHA20:EECDH+AES128:RSA+AES128:EECDH+AES256:RSA+AES256:EECDH+3DES:RSA+3DES:!MD5;

        # Improve HTTPS performance with session resumption
        ssl_session_cache shared:SSL:50m;
        ssl_session_timeout 1d;

        # DH parameters
        ssl_dhparam /etc/nginx/ssl/dhparam.pem;
        # Enable HSTS
        add_header Strict-Transport-Security "max-age=31536000" always;
Redirect toàn bộ www http sang https
Trong block server { ... } ở phía trên cùng:
+ Chuyển server_name www.hocvps.com; thành server_name hocvps.com www.hocvps.com;
+ Chuyển rewrite ^(.*) http://hocvps.com$1 permanent; thành rewrite ^(.*) https://hocvps.com$1 permanent;
Kết quả được như sau:
server {
	listen 80;
	server_name hocvps.com www.hocvps.com;
	rewrite ^(.*) https://hocvps.com$1 permanent;
}
Lúc này khi truy cập https://hocvps.com và http://www.hocvps.com sẽ tự động redirect sang https://hocvps.com
Redirect toàn bộ www https sang https
Thêm mới block server { ... } ở trên cùng
server {
	listen 443 ssl;
	server_name www.hocvps.com;

	# SSL
	ssl_certificate /etc/letsencrypt/live/hocvps.com/fullchain.pem;
	ssl_certificate_key /etc/letsencrypt/live/hocvps.com/privkey.pem;
	ssl_protocols TLSv1 TLSv1.1 TLSv1.2;
	ssl_prefer_server_ciphers on;
	ssl_ciphers EECDH+CHACHA20:EECDH+AES128:RSA+AES128:EECDH+AES256:RSA+AES256:EECDH+3DES:RSA+3DES:!MD5;

	rewrite ^(.*) https://hocvps.com$1 permanent;
}
Lúc này khi truy cập https://www.hocvps.com sẽ tự động redirect sang https://hocvps.com
Cấu hình SSL với port quản lý HocVPS Script Admin
Lưu ý:
- Chỉ thiết lập đối với domain chính cài HocVPS – Domain phụ KHÔNG thiết lập.
- Đây chỉ là bước tùy chọn, nếu bạn sử dụng Cloudflare và kích hoạt đám mây màu vàng ẩn IP thì không làm bước này mà sử dụng link
http://IP:portđể vào khu vực quản trị HocVPS Script Admin.
Ví dụ khi cài đặt mình để port mặc định 2018 thì sẽ tìm block cuối cùng server { ... } trong file cấu hình domain .conf có dòng listen 2018;
Cấu hình SSL cho port HocVPS tương tự như bên dưới:
server {
	listen 2018 ssl;

 	access_log        off;
	log_not_found     off;
 	error_log         off;

    	root /home/hocvps.com/private_html;
	index index.php index.html index.htm;
    	server_name hocvps.com;

        error_page  497 https://$server_name:$server_port$request_uri;

	ssl_certificate /etc/letsencrypt/live/hocvps.com/fullchain.pem;
	ssl_certificate_key /etc/letsencrypt/live/hocvps.com/privkey.pem;
	ssl_protocols TLSv1 TLSv1.1 TLSv1.2;
	ssl_prefer_server_ciphers on;
	ssl_ciphers EECDH+CHACHA20:EECDH+AES128:RSA+AES128:EECDH+AES256:RSA+AES256:EECDH+3DES:RSA+3DES:!MD5;

	auth_basic "Restricted";
	auth_basic_user_file /home/hocvps.com/private_html/hocvps/.htpasswd;

	...
Lúc này truy cập HocVPS Script Admin qua https://domain.com:2018
File cấu hình Nginx cuối cùng sẽ tương tự như sau:
server {
	listen 443 ssl;
	server_name www.hocvps.com;

	# SSL
	ssl_certificate /etc/letsencrypt/live/hocvps.com/fullchain.pem;
	ssl_certificate_key /etc/letsencrypt/live/hocvps.com/privkey.pem;
	ssl_protocols TLSv1 TLSv1.1 TLSv1.2;
	ssl_prefer_server_ciphers on;
	ssl_ciphers EECDH+CHACHA20:EECDH+AES128:RSA+AES128:EECDH+AES256:RSA+AES256:EECDH+3DES:RSA+3DES:!MD5;

	rewrite ^(.*) https://hocvps.com$1 permanent;
}
server {
	listen 80;
	server_name hocvps.com www.hocvps.com;
	rewrite ^(.*) https://hocvps.com$1 permanent;
}

server {
	listen 443 ssl default_server;

	# access_log off;
	access_log /home/hocvps.com/logs/access.log;
	# error_log off;
    	error_log /home/hocvps.com/logs/error.log;

    	root /home/hocvps.com/public_html;
	index index.php index.html index.htm;
    	server_name hocvps.com;

	# SSL
	ssl_certificate /etc/letsencrypt/live/hocvps.com/fullchain.pem;
	ssl_certificate_key /etc/letsencrypt/live/hocvps.com/privkey.pem;
	ssl_protocols TLSv1 TLSv1.1 TLSv1.2;
	ssl_prefer_server_ciphers on;
	ssl_ciphers EECDH+CHACHA20:EECDH+AES128:RSA+AES128:EECDH+AES256:RSA+AES256:EECDH+3DES:RSA+3DES:!MD5;

        # Improve HTTPS performance with session resumption
        ssl_session_cache shared:SSL:50m;
        ssl_session_timeout 1d;

        # DH parameters
        ssl_dhparam /etc/nginx/ssl/dhparam.pem;
        # Enable HSTS
        add_header Strict-Transport-Security "max-age=31536000" always;

    	location / {
		try_files $uri $uri/ /index.php?$args;
	}

	# Custom configuration
	include /home/hocvps.com/public_html/*.conf;

    	location ~ \.php$ {
		fastcgi_split_path_info ^(.+\.php)(/.+)$;
        	include /etc/nginx/fastcgi_params;
        	fastcgi_pass 127.0.0.1:9000;
        	fastcgi_index index.php;
		fastcgi_connect_timeout 1000;
		fastcgi_send_timeout 1000;
		fastcgi_read_timeout 1000;
		fastcgi_buffer_size 256k;
		fastcgi_buffers 4 256k;
		fastcgi_busy_buffers_size 256k;
		fastcgi_temp_file_write_size 256k;
		fastcgi_intercept_errors on;
        	fastcgi_param SCRIPT_FILENAME /home/hocvps.com/public_html$fastcgi_script_name;
    	}
	location /nginx_status {
  		stub_status on;
  		access_log   off;
                allow 127.0.0.1;
                deny all;
	}
	location /php_status {
		fastcgi_pass 127.0.0.1:9000;
		fastcgi_index index.php;
		fastcgi_param SCRIPT_FILENAME  /home/hocvps.com/public_html$fastcgi_script_name;
		include /etc/nginx/fastcgi_params;
                allow 127.0.0.1;
                deny all;
    	}
	# Disable .htaccess and other hidden files
	location ~ /\.(?!well-known).* {
		deny all;
		access_log off;
		log_not_found off;
	}
        location = /favicon.ico {
                log_not_found off;
                access_log off;
        }
        location = /robots.txt {
                allow all;
                log_not_found off;
                access_log off;
        }
	location ~* \.(3gp|gif|jpg|jpeg|png|ico|wmv|avi|asf|asx|mpg|mpeg|mp4|pls|mp3|mid|wav|swf|flv|exe|zip|tar|rar|gz|tgz|bz2|uha|7z|doc|docx|xls|xlsx|pdf|iso|eot|svg|ttf|woff)$ {
	        gzip_static off;
		add_header Pragma public;
		add_header Cache-Control "public, must-revalidate, proxy-revalidate";
		access_log off;
		expires 30d;
		break;
        }

        location ~* \.(txt|js|css)$ {
	        add_header Pragma public;
		add_header Cache-Control "public, must-revalidate, proxy-revalidate";
		access_log off;
		expires 30d;
		break;
        }
}

server {
	listen 2018 ssl;

 	access_log        off;
	log_not_found     off;
 	error_log /home/hocvps.com/logs/nginx_error.log;

    	root /home/hocvps.com/private_html;
	index index.php index.html index.htm;
    	server_name hocvps.com;

        error_page 497 https://$server_name:$server_port$request_uri;

	ssl_certificate /etc/letsencrypt/live/hocvps.com/fullchain.pem;
	ssl_certificate_key /etc/letsencrypt/live/hocvps.com/privkey.pem;
	ssl_protocols TLSv1 TLSv1.1 TLSv1.2;
	ssl_prefer_server_ciphers on;
	ssl_ciphers EECDH+CHACHA20:EECDH+AES128:RSA+AES128:EECDH+AES256:RSA+AES256:EECDH+3DES:RSA+3DES:!MD5;

	auth_basic "Restricted";
	auth_basic_user_file /home/hocvps.com/private_html/hocvps/.htpasswd;

     	location / {
		autoindex on;
		try_files $uri $uri/ /index.php;
	}

    	location ~ \.php$ {
		fastcgi_split_path_info ^(.+\.php)(/.+)$;
        	include /etc/nginx/fastcgi_params;
        	fastcgi_pass 127.0.0.1:9000;
        	fastcgi_index index.php;
		fastcgi_connect_timeout 1000;
		fastcgi_send_timeout 1000;
		fastcgi_read_timeout 1000;
		fastcgi_buffer_size 256k;
		fastcgi_buffers 4 256k;
		fastcgi_busy_buffers_size 256k;
		fastcgi_temp_file_write_size 256k;
		fastcgi_intercept_errors on;
        	fastcgi_param SCRIPT_FILENAME /home/hocvps.com/private_html$fastcgi_script_name;
    	}

	location ~ /\. {
		deny all;
	}
}
_ Cấu hình SSL cho domain không phải domain chính trong HocVPS Script:
- Không thiết lập HocVPS Admin Port
- Bỏ tham số
default_serverbên cạnhlisten 443
_ Để kết hợp sử dụng CDN Cloudflare (biểu tượng đám mây vàng):
- Thiết lập Full (strict) trong menu Crypto SSL tại trang quản lý Cloudflare.
- Không cấu hình SSL phần Admin HocVPS. Khi đó, truy cập HocVPS Admin bằng
ip:port - Không thể gia hạn tự động SSL Let’s Encrypt. Gia hạn thủ công 3 tháng 1 lần.
_ Cấu hình HTTP/2 tham khảo Kích hoạt HTTP/2 với Nginx.
_ Tham khảo thêm Tối ưu HTTPS trên Nginx.
Kiểm tra lại cấu hình Nginx
nginx -t
Phản hồi như sau là ok:
nginx: the configuration file /etc/nginx/nginx.conf syntax is ok
nginx: configuration file /etc/nginx/nginx.conf test is successful
Khởi động lại Nginx
service nginx restart
Giờ truy cập vào domain để tận hưởng thành quả thôi.
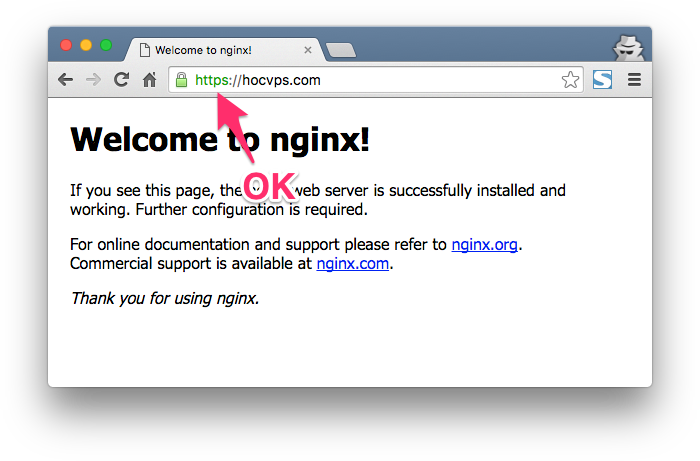
Lưu ý:
- Bạn phải chuyển toàn bộ link image, js, css từ http:// sang https:// thì mới có biểu tượng màu xanh như demo. Xem thêm hướng dẫn.
- Nếu bạn dùng WordPress, hãy cài đặt plugin Really Simple SSL để tự động redirect http sang https và chuyển toàn bộ link .css, .js sang https. Thanh địa chỉ lúc này sẽ có màu xanh.
- Nếu không muốn dùng plugin tự động Really Simple SSL, bạn hãy tham khảo thêm Hướng dẫn cài đặt Let’s Encrypt trong cPanel để biết cách thao tác thủ công.
3/ Cập nhật cấu hình trong Google Search Console và Analytics
Phần này bắt buộc phải làm để không làm ảnh hưởng đến thứ hạng từ khóa trên Google của website, mình đã có hướng dẫn chi tiết từng bước trên Canh Me, mời bạn tham khảo tại link này.
4/ Tự động gia hạn Let’s Encrypt
Chứng chỉ Let’s Encrypt chỉ sử dụng được trong vòng 90 ngày và bạn cần phải chạy lại dòng lệnh bên dưới để gia hạn.
certbot renew --pre-hook "service nginx stop" --post-hook "service nginx start"
Tuy nhiên, mình sẽ hướng dẫn các bạn cấu hình để tự động gia hạn chứng chỉ này với crontab, như vậy chúng ta sẽ sử dụng SSL miễn phí trọn đời mà không cần phải lo về việc gia hạn nữa.
Mở file cấu hình crontab:
# EDITOR=nano crontab -e
Copy và paste đoạn code bên dưới vào cửa sổ terminal:
30 2 * * * /usr/bin/certbot renew --pre-hook "service nginx stop" --post-hook "service nginx start" >> /var/log/le-renew.log
Nhấn Ctrl+O, Enter để lưu và Ctrl+X để thoát. Bạn nhận được thông báo sau là thành công
crontab: installing new crontab
crontab trên sẽ tự động chạy lệnh gia hạn Let’s Encrypt vào lúc 2h30 hàng ngày và kiểm tra xem đã hết hạn chưa và tiến hành gia hạn. Trước khi gia hạn sẽ stop Nginx, sau đó sẽ start lại ngay lập tức. Như vậy, gần như không ảnh hưởng gì cả đến website.
Vậy là xong, bạn có thể yên tâm sử dụng Let’s Encrypt rồi đấy.
Lưu ý: Nếu chứng chỉ không tự động gia hạn, kiểm tra theo mục 6.Một số vấn đề gặp phải
5/ Xóa chứng chỉ Let’s Encrypt
Khi bạn không sử dụng Let’s Encrypt nữa, chuyển qua sử dụng của nhà cung cấp khác và muốn xóa chứng chỉ Let’s Encrypt đã cài, hãy sử dụng lệnh bên dưới:
# Remove Let's Encrypt
certbot delete
Tiếp theo nhập số thứ tự chứng chỉ tương ứng với tên miền bạn muốn xóa, nhấn Enter là mọi thứ sẽ được dọn dẹp sạch sẽ.
6/ Một số vấn đề gặp phải
Đến ngày hết hạn mà chứng chỉ Let’s Encrypt không tự động gia hạn, mặc dù crontab vẫn chạy, kiểm tra log không thấy thông tin gì đặc biệt? Chạy lệnh gia hạn thủ công thì lại được. Theo kinh nghiệm của mình thì vấn đề ở mã nguồn Let’s Encrypt hoặc PATH service
Đối với vấn đề mã nguồn, chỉ cần clone lại bộ code của Let’s Encrypt là sẽ giải quyết được vấn đề.
# cd /opt/letsencrypt && git pull
Nếu gặp thông báo lỗi thì sử dụng lệnh này: # cd /opt/letsencrypt && git reset --hard && git pull
Đối với vấn đề PATH service, các bạn chú ý những dấu hiệu sau:
Kiểm tra nội dung /var/spool/mail/root thấy:
Failed to find executable /usr/sbin/service in PATH:/usr/local/sbin:/usr/local/bin:/sbin:/bin:/usr/sbin:/usr/bin:/root/bin
Unable to find pre-hook command /usr/sbin/service in the PATH.
(PATH is /usr/local/sbin:/usr/local/bin:/sbin:/bin:/usr/sbin:/usr/bin:/root/bin)
Kiểm tra nội dung /var/log/cron thấy cronjob vẫn chạy hàng ngày. Kiểm tra nội dung /var/log/le-renew.log và bên trong /var/log/letencrypt không thấy gì khả nghi.
– Nguyên nhân: service không nằm trong PATH, vấn đề này gặp ở 1 số VPS.
# whereis service
service: /sbin/service /usr/share/man/man8/service.8.gz
# echo $PATH
/usr/bin:/bin:/usr/sbin:/usr/local/bin:/usr/local/sbin
Có thể thấy, lệnh service nằm trong /sbin/service, không thuộc biến môi trường PATH. Crontab chỉ tìm /usr/sbin/service và không thấy.
– Giải pháp::
Bạn cần sử dụng đường dẫn cụ thể để chạy lệnh service trong crontab. Vị trí sẽ tùy thuộc vào từng hệ thống, kiểm tra bằng # whereis service.
Ví dụ, khi là /sbin/service thì câu lệnh chèn vào crontab sẽ như sau:
30 2 * * * certbot renew --pre-hook "/sbin/service nginx stop" --post-hook "/sbin/service nginx start" >> /var/log/le-renew.log
– Dấu hiệu: Đến ngày hết hạn thì không thể renew, với thông báo:
Renewal configuration file /etc/letsencrypt/renewal/hocvps.com.conf produced an unexpected error: [('PEM routines', 'PEM_read_bio', 'no start line')]. Skipping.

No renewals were attempted.
Hoặc expected /etc/letsencrypt/live/hocvps.com/cert.pem to be a symlink
– Nguyên nhân: Bộ chứng chỉ bị corrupt khiến Let’s Encrypt không thể đọc và renew.
Kiểm tra nội dung cert và private key:
# openssl x509 -noout -text -in /etc/letsencrypt/live/hocvps.com/cert.pem
unable to load certificate
3077703404:error:0906D06C:PEM routines:PEM_read_bio:no start line:pem_lib.c:703:Expecting: TRUSTED CERTIFICATE
# openssl rsa -noout -text -in /etc/letsencrypt/live/hocvps.com/privkey.pem -check
unable to load Private Key
3078170348:error:0906D06C:PEM routines:PEM_read_bio:no start line:pem_lib.c:703:Expecting: ANY PRIVATE KEY
Kiểm tra MD5 của cert và key (trùng nhau là ok):
# openssl x509 -noout -modulus -in fullchain.pem | openssl md5
# openssl rsa -noout -modulus -in privkey.pem | openssl md5
Kiểm tra danh sách cert trong VPS
#  certbot certificates
Found the following certs:
  Certificate Name: hocvps.com
    Domains: hocvps.com www.hocvps.com
    Expiry Date: 2018-05-27 09:15:09+00:00 (VALID: 89 days)
    Certificate Path: /etc/letsencrypt/live/hocvps.com/fullchain.pem
    Private Key Path: /etc/letsencrypt/live/hocvps.com/privkey.pem
-------------------------------------------------------------------------------
– Giải pháp: xóa hoàn toàn cert cũ rồi issue lại cert mới (như mục 1.)
# cd /opt/letsencrypt
# ./certbot delete --cert-name hocvps.com
Saving debug log to /var/log/letsencrypt/letsencrypt.log
-------------------------------------------------------------------------------
Deleted all files relating to certificate hocvps.com.
-------------------------------------------------------------------------------
– Nguyên nhân & Dấu hiệu:
VPS không thể kết nối ra ngoài qua giao thức HTTPS, khi đó cũng không thể issue/renew các chứng chỉ SSL. Ví dụ không thể truy cập qua HTTPS
# curl https://google.com
curl: (77) Problem with the SSL CA cert (path? access rights?)
#curl https://github.com/letsencrypt/letsencrypt
curl: (35) SSL connect error
– Giải pháp:
Đối với lỗi (77): cài đặt lại chứng chỉ trong VPS:
Bước 1: Di chuyển/Đổi tên chứng chỉ cũ
- CentOS6 chứng chỉ lưu tại
/etc/ssl/certs/ca-bundle.crt - CentOS7 chứng chỉ lưu tại
/etc/pki/ca-trust/extracted/pem/tls-ca-bundle.pem
Bước 2: Cài đặt lại chứng chỉ. Khi đó, bạn có thể curl HTTPS và issue/renew chứng chỉ bình thường.
# yum reinstall -y ca-certificates
– Đối với lỗi (35) – Cập nhật NSS
# yum update nss -y
Chúc bạn thành công.
Mình làm lần 1 trên site maykangenchinhhang.cf ok.
Lần 2 mình làm cho site kangenvn.cf trên cùng 1 vps. Làm xong Nginx test lại nhận đc thông báo này
[root@vultr home]# nginx -t
nginx: [emerg] a duplicate default server for 0.0.0.0:443 in /etc/nginx/conf.d/maykangenchinhhang.cf.conf:21
nginx: configuration file /etc/nginx/nginx.conf test failed
[root@vultr home]#
không biết sai chỗ nào luôn. Nhờ ad chỉ mình với.
Cảm ơn ad
Đối với domain không phải domain chính cài HocVPS, bạn bỏ default_server nhé. Chính là phần note đỏ trong bài viết đó
Của mình cấu hình xong dùng lệnh nginx -t kiểm tra nó báo lỗi như vậy là sao ta
nginx -t
nginx: [emerg] cannot load certificate “/etc/letsencrypt/live/abc.com/fullchain.pem”: BIO_new_file() failed (SSL: error:02001002:system library:fopen:No such file or directory:fopen(‘/etc/letsencrypt/live/abc.com/fullchain.pem’,’r’) error:2006D080:BIO routines:BIO_new_file:no such file)
nginx: configuration file /etc/nginx/nginx.conf test failed
Không tồn tại chứng chỉ cho abc.com. Bạn kiểm tra lại chứng chỉ đã phát hành nhé
Xin chào
Sau khi mình cài xong ssl thì không vào được phần filemaneger, phpmyadmin nữa.Nó báo lỗi “403 Forbidden nginx”. bạn có thể hướng dẫn mình sửa được không?
Cấu hình cài SSL trên Domain của bạn như thế nào?
Mình kiểm tra bị lỗi này là sao nhỉ
nginx: [emerg] invalid parameter “sll” in /etc/nginx/conf.d/domain.com.conf:128
Dòng 123 của Nginx Conf Domain bạn dùng
sllvà Nginx không hiểu từ đó.Bạn kiểm tra lại nhé
Mình tìm ra lỗi tại sao rồi. tại lúc tạo khởi tạo chứng chỉ mình chỉ tạo domain.com mà k tạo cả http://www.domain.com lên bị thế.
Bạn ơi khi mình cài SSL, nó bị lỗi đụng port
(http://prntscr.com/nlt3ge) nên domain chính thì vô ok, domain thứ 2
nó ra data domain 1. Mình khác phục ntn vậy bạn?
File conf domain chính: https://notepad.vn/hehssbq30
File conf domain 2: https://notepad.vn/domain2
2 file Nginx Conf thì mình thấy bình thường. Nhưng đọc status Nginx như thế kia thì ra lỗi rồi
Nên mình nghĩ lặp này là ở file khác. Ví dụ ngoài 2 file trên, có 1 file khác trong /etc/nginx/conf.d của bạn cũng quy định về domain này, nên nó xung đột. Thậm chí forourpet.com còn cấu hình cả port 453, mà file bạn gửi mình đâu có chỗ nào 453
Đầu tiên, bạn restart lại Nginx. Xong check lại status chuẩn của Nginx. Sau kiểm tra hết các file trong /etc/nginx/conf.d đi
Mình trỏ domain đến ip vps chưa nhận ra thì mình đã làm theo các bước nên bị lỗi, mình đã thao tác xoá cài ssl đi làm lại nhưng không thực hiện được nữa thông báo:
[root@instance-1 home]# yum -y install git
Loaded plugins: fastestmirror
Loading mirror speeds from cached hostfile
* base: centos.mirror.nsw.au.hostlink.com.au
* epel: my.fedora.ipserverone.com
* extras: mirror-hk.koddos.net
* remi: mirror.innosol.asia
* remi-php71: mirror.innosol.asia
* remi-safe: mirror.innosol.asia
* updates: mirror.horizon.vn
Package git-1.8.3.1-20.el7.x86_64 already installed and latest version
Nothing to do
[root@instance-1 home]#
Admin giúp mình với
Mình không thấy lỗi gì ở việc bạn mô tả cả. Thông báo trên là git đã được cài rồi, không cần cài nữa.
Nên bạn thực hiện tiếp nhé
Hiện tại mình đang gặp 1 lỗi nghiêm trọng trong việc cài đặt SSL. Mình đã làm theo đầy đủ các bước mà hocvps hướng dẫn. Website chính cũng chạy thành công SSL. Nhưng khi mình thêm domain thứ 2 vào. Thì chạy SSL vẫn được nhưng báo lỗi xác thực SSL. Vì khi truy cập domain2, server vẫn khai báo SSL của domain1. Mong hocvps giúp mình sửa lỗi này.
1. Website 1 và 2 của bạn là gì
2. Cung cấp mình Nginx Conf của 2 domain
3. systemctl status nginx của bạn ra kết quả gì
AD ƠI SAU KHI MÌNH CHẠY CÂU LỆNH NÀY:
# Stop Nginx
service nginx stop
# Install Let’s Encrypt
/opt/letsencrypt/certbot-auto certonly –standalone
VÀ THÊM DOMAIN MỚI THÌ NÓ HIỆN THẾ NÀY:
Obtaining a new certificate
Performing the following challenges:
http-01 challenge for http://www.green100.vn
Waiting for verification…
Challenge failed for domain http://www.green100.vn
http-01 challenge for http://www.green100.vn
Cleaning up challenges
Some challenges have failed.
IMPORTANT NOTES:
– The following errors were reported by the server:
Domain: http://www.green100.vn
Type: connection
Detail: dns :: DNS problem: NXDOMAIN looking up A for
http://www.green100.vn
To fix these errors, please make sure that your domain name was
entered correctly and the DNS A/AAAA record(s) for that domain
contain(s) the right IP address. Additionally, please check that
your computer has a publicly routable IP address and that no
firewalls are preventing the server from communicating with the
client. If you’re using the webroot plugin, you should also verify
that you are serving files from the webroot path you provided.
[root@webchuyennghiep247 home]# nginx -t
nginx: [emerg] BIO_new_file(“/etc/letsencrypt/live/green100.vn/fullchain.pem”) failed (SSL: error:02001002:system library:fopen:No such file or directory:fopen(‘/etc/letsencrypt/live/green100.vn/fullchain.pem’,’r’) error:2006D080:BIO routines:BIO_new_file:no such file)
nginx: configuration file /etc/nginx/nginx.conf test failed
AD CÓ THỂ GIẢI NGHĨA NGUYÊN NHÂN VÌ SAO ? CÁCH KHẮC PHỤC ? CẢM ƠN AD
Record
wwwcủa domain không trỏ về VPS, đang trỏ về 125.235.4.59. Bạn kiểm tra lại nhéRecord non-www thì trỏ về VPS rồi, [45.76.150.245]
Và sau này bạn tạo chứng chỉ thành công (như trong bài viết đề cập) thì mới làm bước tiếp theo, chỉnh sửa cấu hình Nginx
Khi mình chạy /opt/letsencrypt/certbot-auto certonly –standalone thì bó báo lỗi như dưới. admin giúp mình với
Saving debug log to /var/log/letsencrypt/letsencrypt.log
Plugins selected: Authenticator standalone, Installer None
An unexpected error occurred:
ConnectionError: HTTPSConnectionPool(host=’acme-v02.api.letsencrypt.org’, port=443): Max retries exceeded with url: /directory (Caused by NewConnectionError(‘: Failed to establish a new connection: [Errno -3] Temporary failure in name resolution’,))
Please see the logfiles in /var/log/letsencrypt for more details.
1. Domain bạn là gì?
2. VPS bạn có đóng cổng 443 không? https://ping.eu/port-chk/
3. Bạn có dùng Cloudflare đám mây vàng không
4. Cung cấp mình nội dung /etc/resolv.conf
Domain của mình là dendietcontrung.net. Hôm trước mình có cài đặt ssl cho 1 site thì vẫn bình thường, giờ mình muốn cài nữa thì nó báo lỗi như vậy. Mình không có dùng Cloudflare đám mây vàng bạn.
Nội dụng /etc/resolv.conf
# Generated by NetworkManager
nameserver 115.84.181.20
nameserver 115.84.177.20
Bạn xem và tư vấn giúp mình với
1. Bạn chạy lệnh sau rồi chạy lại lệnh issue cert
# yum install traceroute - y && yum install telnet -y# traceroute acme-v02.api.letsencrypt.org
# telnet acme-v02.api.letsencrypt.org 443
2. Bên cạnh đó, hình như bạn không cài
default_serverà ? Vì mình truy cập thẳng IP 171.244.xxx.xxx không thấy redirect thẳng ra domain mannhuaxxxMình chạy lệnh hình như nó bị lỗi nữa bạn ơi.
Loaded plugins: fastestmirror
Determining fastest mirrors
epel/x86_64/metalink | 3.8 kB 00:00
* base: centos-hcm.viettelidc.com.vn
* epel: mirror.horizon.vn
* extras: centos-hcm.viettelidc.com.vn
* remi: mirrors.thzhost.com
* remi-php55: mirrors.thzhost.com
* remi-php56: mirrors.thzhost.com
* remi-safe: mirrors.thzhost.com
* remi-test: mirrors.thzhost.com
* updates: centos-hcm.viettelidc.com.vn
base | 3.6 kB 00:00
epel | 4.7 kB 00:00
extras | 3.4 kB 00:00
nginx | 2.9 kB 00:00
remi | 3.0 kB 00:00
http://rpms.remirepo.net/enterprise/7/debug-remi/x86_64/repodata/repomd.xml: [Er rno 14] curl#6 – “Could not resolve host: rpms.remirepo.net; Unknown error”
Trying other mirror.
One of the configured repositories failed (Remi’s RPM repository for Enterprise Linux 7 – x86_64 – debuginfo),
and yum doesn’t have enough cached data to continue. At this point the only
safe thing yum can do is fail. There are a few ways to work “fix” this:
1. Contact the upstream for the repository and get them to fix the problem.
2. Reconfigure the baseurl/etc. for the repository, to point to a working
upstream. This is most often useful if you are using a newer
distribution release than is supported by the repository (and the
packages for the previous distribution release still work).
3. Run the command with the repository temporarily disabled
yum –disablerepo=remi-debuginfo …
4. Disable the repository permanently, so yum won’t use it by default. Yum
will then just ignore the repository until you permanently enable it
again or use –enablerepo for temporary usage:
yum-config-manager –disable remi-debuginfo
or
subscription-manager repos –disable=remi-debuginfo
5. Configure the failing repository to be skipped, if it is unavailable.
Note that yum will try to contact the repo. when it runs most commands,
so will have to try and fail each time (and thus. yum will be be much
slower). If it is a very temporary problem though, this is often a nice
compromise:
yum-config-manager –save –setopt=remi-debuginfo.skip_if_unavailabl e=true
failure: repodata/repomd.xml from remi-debuginfo: [Errno 256] No more mirrors to try.
http://rpms.remirepo.net/enterprise/7/debug-remi/x86_64/repodata/repomd.xml: [Er rno 14] curl#6 – “Could not resolve host: rpms.remirepo.net; Unknown error”
[root@171 ~]# traceroute acme-v02.api.letsencrypt.org
-bash: traceroute: command not found
Bạn xem giúp mình có phải bị lỗi không với. Mình cũng chưa cài defaul_server luôn.
Mình chạy lệnh hình như nó báo lỗi nữa bạn ơi.
Loaded plugins: fastestmirror
Determining fastest mirrors
epel/x86_64/metalink | 3.8 kB 00:00
* base: centos-hcm.viettelidc.com.vn
* epel: mirror.horizon.vn
* extras: centos-hcm.viettelidc.com.vn
* remi: mirrors.thzhost.com
* remi-php55: mirrors.thzhost.com
* remi-php56: mirrors.thzhost.com
* remi-safe: mirrors.thzhost.com
* remi-test: mirrors.thzhost.com
* updates: centos-hcm.viettelidc.com.vn
base | 3.6 kB 00:00
epel | 4.7 kB 00:00
extras | 3.4 kB 00:00
nginx | 2.9 kB 00:00
remi | 3.0 kB 00:00
http://rpms.remirepo.net/enterprise/7/debug-remi/x86_64/repodata/repomd.xml: [Errno 14] curl#6 – “Could not resolve host: rpms.remirepo.net; Unknown error”
Trying other mirror.
One of the configured repositories failed (Remi’s RPM repository for Enterprise Linux 7 – x86_64 – debuginfo),
and yum doesn’t have enough cached data to continue. At this point the only
safe thing yum can do is fail. There are a few ways to work “fix” this:
1. Contact the upstream for the repository and get them to fix the problem.
2. Reconfigure the baseurl/etc. for the repository, to point to a working
upstream. This is most often useful if you are using a newer
distribution release than is supported by the repository (and the
packages for the previous distribution release still work).
3. Run the command with the repository temporarily disabled
yum –disablerepo=remi-debuginfo …
4. Disable the repository permanently, so yum won’t use it by default. Yum
will then just ignore the repository until you permanently enable it
again or use –enablerepo for temporary usage:
yum-config-manager –disable remi-debuginfo
or
subscription-manager repos –disable=remi-debuginfo
5. Configure the failing repository to be skipped, if it is unavailable.
Note that yum will try to contact the repo. when it runs most commands,
so will have to try and fail each time (and thus. yum will be be much
slower). If it is a very temporary problem though, this is often a nice
compromise:
yum-config-manager –save –setopt=remi-debuginfo.skip_if_unavailable=true
failure: repodata/repomd.xml from remi-debuginfo: [Errno 256] No more mirrors to try.
http://rpms.remirepo.net/enterprise/7/debug-remi/x86_64/repodata/repomd.xml: [Errno 14] curl#6 – “Could not resolve host: rpms.remirepo.net; Unknown error”
[root@171 ~]# traceroute acme-v02.api.letsencrypt.org
-bash: traceroute: command not found
Bạn xem giúp mình với
Bạn sửa DNS xem có fix được không. Nếu không được thì phải sửa trong repo
https://hocvps.com/cau-hoi/cach-xu-ly-loi-couldnt-resolve-host-mirrorlist-centos-org/
Lỗi do kết nối không thành công từ VPS đến repo của CentOS
Mình đổi DNS fix được rồi, thanks bạn nhé
Ok bạn, noted
ad cho mình hỏi vậy là không có cách nào vừa dùng Cloudflare CDN (mây vàng) để ẩn IP của server và vừa chỉnh SSL cho domain:port để vào HocVPS Admin ? Nếu vậy thì truy cập qua ip:port không SSL có nguy cơ gì không nhỉ nếu cần phải truy cập tại nơi công cộng như wifi quán cafe ?
Vốn dĩ HocVPS Admin vẫn có 1 tầng bảo vệ bằng mật khẩu mà bạn
Còn kia thì không có cách nào rồi, vì CF chặn truy cập qua port lạ. Có 1 cách là cấu hình cho HocVPS Admin qua subdomain xyz nào đó, tuy vậy sẽ cần biết cách cấu hình và hy sinh 1 subdomain chỉ để truy cập HocVPs ADmin
Mình test thì bị lỗi này
nnginx: [emerg] BIO_new_file(“/etc/nginx/ssl/dhparam.pem”) failed (SSL: error:020 01002:system library:fopen:No such file or directory:fopen(‘/etc/nginx/ssl/dhpar am.pem’,’r’) error:2006D080:BIO routines:BIO_new_file:no such file)
nginx: configuration file /etc/nginx/nginx.conf test failed
Tìm trên mạng hướng dẫn chạy
sudo openssl dhparam -out /etc/ssl/certs/dhparam.pem 2048
Nhưng cũng không dc
Bạn có thể giúp mình?
Xin cảm ơn!
Bạn thực hiện phần này chưa
Tạo file DH parameters 2048 bit (tạo một lần duy nhất trên VPS)Trong bài viết có đề cập mà
nginx: [warn] duplicate value “TLSv1” in /etc/nginx/conf.d/domain.conf:148
nginx: [warn] duplicate value “TLSv1.1” in /etc/nginx/conf.d/domain.conf:148
nginx: [warn] duplicate value “TLSv1.2” in /etc/nginx/conf.d/domain.conf:148
nginx: [emerg] “ssl_prefer_server_ciphers” directive is duplicate in /etc/nginx/conf.d/domain.conf:149
nginx: configuration file /etc/nginx/nginx.conf test failed
Xin phép ko để domain lên. Nhưng báo thế này.
Dòng 148 và 149 lặp với 1 dòng nào đó. Bạn kiểm tra lại cả file nhé
https://github.com/letsencrypt/letsencrypt /opt/letsencrypt link này đang down add ơi
Link tự động direct sang https://github.com/certbot/certbot. Hoạt động bình thường mà bạn
[root@1857820-01 home]# git clone https://github.com/letsencrypt/letsencrypt/opt/letsencrypt
Initialized empty Git repository in /home/letsencrypt/.git/
error: while accessing https://github.com/letsencrypt/letsencrypt/opt/letsencrypt/info/refs
fatal: HTTP request failed
[root@1857820-01 home]# # Clone Let’s Encrypt repository
[root@1857820-01 home]# git clone https://github.com/certbot/certbot
Initialized empty Git repository in /home/certbot/.git/
error: while accessing https://github.com/certbot/certbot/info/refs
fatal: HTTP request failed
[root@1857820-01 home]# # Clone Let’s Encrypt repository
[root@1857820-01 home]# git clone https://github.com/letsencrypt/letsencrypt /opt/letsencrypt
Initialized empty Git repository in /opt/letsencrypt/.git/
error: while accessing https://github.com/letsencrypt/letsencrypt/info/refs
fatal: HTTP request failed
Vẫn bình thường nhé
# git clone https://github.com/letsencrypt/letsencrypt /opt/letsencryptCloning into '/opt/letsencrypt'...
remote: Enumerating objects: 20, done.
remote: Counting objects: 100% (20/20), done.
remote: Compressing objects: 100% (20/20), done.
remote: Total 64348 (delta 7), reused 4 (delta 0), pack-reused 64328
Receiving objects: 100% (64348/64348), 21.24 MiB | 11.26 MiB/s, done.
Resolving deltas: 100% (47036/47036), done.
Bạn ping được HTTPs không
# curl https://google.com# curl https://github.com/letsencrypt/letsencrypt
Mình bị lỗi ko tự động gia hạn, có chạy lại theo lệnh ở trên nhưng cũng ko được. Luân xem giúp mình với
https://prnt.sc/nbarf5
Cung cấp mình kết quả 2 lệnh này
curl https://google.com
curl https://github.com/letsencrypt/letsencrypt
Cám ơn bạn đã hỗ trợ. Lúc chiều mình thử gỡ ra rồi cài lại thì lại đc.
Còn đây là ảnh mà bạn cần cung cấp: https://prnt.sc/nbf1x5
SSL của VPS vẫn bình thường. Vậy chắc lỗi do mã nguồn. Pull lại là được
https://hocvps.com/cai-dat-lets-encrypt/#chung-chi-khong-tu-dong-gia-han
Cài đặt chứng chỉ SSL Let’s Encrypt cho nhiều website : là dùng lệnh ở trên phần này tạo ra thư mục riêng cho tên miền đó rồi lặp lại cách cấu hình từ bước 2 trở đi nữa hả bạn ? Không có cách nào auto chỉ cần thêm tên miền thôi hả bạn ?
1. Bạn thực hiện từ bước 1.2 nhé
2. Không có auto nhé bạn, ngay lúc cài đã là thủ công rồi
Mọi người cho em hỏi, cũng là chứng chỉ let’s encrypt, em xem chứng chỉ trên site người khác thì phần mềm internet security check xanh, còn của em cũng let’s encrypt mà báo xám (không an toàn). có cách nào khắc phục không ạ
Xin cảm ơn
Website bạn là gì mình check cho
shalalavilla.com ạ
Secure rồi nhé bạn. Do phiên bản hiện tại Chrome bỏ cảnh báo xanh rồi, chứ website vẫn Secure
http://prntscr.com/naghh0
Chào Phương,
Bạn cho mình hỏi cài Let’s Encrypt có cách nào không stop nginx không?
Cám ơn bạn!
Còn cách khác nhưng lằng nhằng hơn nhiều. Bạn tham khảo https://letsencrypt.org
Nếu mình cài ssl mua thì như thế nào bạn nhỉ ?
Bạn tham khảo bài viết này nhé: https://hocvps.com/cai-dat-chung-chi-ssl/
magento cũng cài như này à ad. file conf có khác gì không ạ
Bạn thêm phần cần thêm thôi. Còn đâu cấu hình gốc giữ nguyên
Chào anh,
Sau khi e cài ssl cho domain thứ 2 (không phải domain chính của vps) em có bỏ các phần deafault_server trong file .conf nhưng khi chạy thì web lại tự động chuyển về web chính của vps.
Thông tin check nginx -t của e (trong đó cheap123.vn là trang đã cài ssl trước đó chứ ko phải là domain chính)
[root@tokyo_centos6_2g home]# nginx -t
nginx: [warn] conflicting server name “cheap123.vn” on 0.0.0.0:80, ignored
nginx: [warn] conflicting server name “www.cheap123.vn” on 0.0.0.0:80, ignored
nginx: the configuration file /etc/nginx/nginx.conf syntax is ok
nginx: configuration file /etc/nginx/nginx.conf test is successful
Mong nhận được hướng dẫn xử lý lỗi
Có tồn tại nhiều hơn 1 đoạn cấu hình về cheap123.vn port 80
Bạn kiểm tra toàn bộ nội dung trong /etc/nginx/conf.d nhé
grep -r "cheap123.vn" /etc/nginx/conf.dCảm ơn anh đã phản hồi!
File .conf của web thứ 2 e dùng y nguyên của web đã cài ssl thành công trước đó, với 1 chút thay đổi:
– Thay tên miền cũ bằng tên miền mới
– Bỏ default_server
Nhưng lúc chạy nginx -t thì báo như vậy. E đã kiểm tra rất kỹ, tất cả “cheap123.vn” đều đã được thay
Kiểm tra bằng lệnh mình comment ở trên đó
mình cũng bị y chang bạn, đang chưa biết sửa sao @@
Xoá cache là ok bạn!
Gio em muon dang ky ssl cho maxcdn phai lam sao a?
Ad giúp mình với. Mình cài SSL xong nó báo lỗi như vậy là sao ạ. ko truy cập được vào website
http://prntscr.com/n0cl7c
server {
listen 443 ssl;
server_name http://www.tsmshops.com;
# SSL
ssl_certificate /etc/letsencrypt/live/tsmshops.com/fullchain.pem;
ssl_certificate_key /etc/letsencrypt/live/tsmshops.com/privkey.pem;
ssl_protocols TLSv1 TLSv1.1 TLSv1.2;
ssl_prefer_server_ciphers on;
ssl_ciphers EECDH+CHACHA20:EECDH+AES128:RSA+AES128:EECDH+AES256:RSA+AES256:EECDH+3DES:RSA+3DES:!MD5;
rewrite ^(.*) https://tsmshops.com$1 permanent;
}
server {
listen 80;
server_name tsmshops.com http://www.tsmshops.com;
rewrite ^(.*) https://tsmshops.com$1 permanent;
}
server {
listen 443 ssl default_server;
# access_log off;
access_log /home/tsmshops.com/logs/access.log;
# error_log off;
error_log /home/tsmshops.com/logs/error.log;
root /home/tsmshops.com/public_html;
index index.php index.html index.htm;
server_name tsmshops.com;
# SSL
ssl_certificate /etc/letsencrypt/live/tsmshops.com/fullchain.pem;
ssl_certificate_key /etc/letsencrypt/live/tsmshops.com/privkey.pem;
ssl_protocols TLSv1 TLSv1.1 TLSv1.2;
ssl_prefer_server_ciphers on;
ssl_ciphers EECDH+CHACHA20:EECDH+AES128:RSA+AES128:EECDH+AES256:RSA+AES256:EECDH+3DES:RSA+3DES:!MD5;
# Improve HTTPS performance with session resumption
ssl_session_cache shared:SSL:50m;
ssl_session_timeout 1d;
# DH parameters
ssl_dhparam /etc/nginx/ssl/dhparam.pem;
# Enable HSTS
add_header Strict-Transport-Security “max-age=31536000” always;
location / {
try_files $uri $uri/ /index.php?$args;
}
# Custom configuration
include /home/tsmshops.com/public_html/*.conf;
location ~ \.php$ {
fastcgi_split_path_info ^(.+\.php)(/.+)$;
include /etc/nginx/fastcgi_params;
fastcgi_pass 127.0.0.1:9000;
fastcgi_index index.php;
fastcgi_connect_timeout 1000;
fastcgi_send_timeout 1000;
fastcgi_read_timeout 1000;
fastcgi_buffer_size 256k;
fastcgi_buffers 4 256k;
fastcgi_busy_buffers_size 256k;
fastcgi_temp_file_write_size 256k;
fastcgi_intercept_errors on;
fastcgi_param SCRIPT_FILENAME /home/tsmshops.com/public_html$fastcgi_script_name;
}
location /nginx_status {
stub_status on;
access_log off;
allow 127.0.0.1;
deny all;
}
location /php_status {
fastcgi_pass 127.0.0.1:9000;
fastcgi_index index.php;
fastcgi_param SCRIPT_FILENAME /home/tsmshops.com/public_html$fastcgi_script_name;
include /etc/nginx/fastcgi_params;
allow 127.0.0.1;
deny all;
}
# Disable .htaccess and other hidden files
location ~ /\.(?!well-known).* {
deny all;
access_log off;
log_not_found off;
}
location = /favicon.ico {
log_not_found off;
access_log off;
}
location = /robots.txt {
allow all;
log_not_found off;
access_log off;
}
location ~* \.(3gp|gif|jpg|jpeg|png|ico|wmv|avi|asf|asx|mpg|mpeg|mp4|pls|mp3|mid|wav|swf|flv|exe|zip|tar|rar|gz|tgz|bz2|uha|7z|doc|docx|xls|xlsx|pdf|iso|eot|svg|ttf|woff)$ {
gzip_static off;
add_header Pragma public;
add_header Cache-Control “public, must-revalidate, proxy-revalidate”;
access_log off;
expires 30d;
break;
}
location ~* \.(txt|js|css)$ {
add_header Pragma public;
add_header Cache-Control “public, must-revalidate, proxy-revalidate”;
access_log off;
expires 30d;
break;
}
}
server {
listen 4444 ssl;
access_log off;
log_not_found off;
error_log /home/tsmshops.com/logs/nginx_error.log;
root /home/tsmshops.com/private_html;
index index.php index.html index.htm;
server_name tsmshops.com;
error_page 497 https://$server_name:$server_port$request_uri;
ssl_certificate /etc/letsencrypt/live/tsmshops.com/fullchain.pem;
ssl_certificate_key /etc/letsencrypt/live/tsmshops.com/privkey.pem;
ssl_protocols TLSv1 TLSv1.1 TLSv1.2;
ssl_prefer_server_ciphers on;
ssl_ciphers EECDH+CHACHA20:EECDH+AES128:RSA+AES128:EECDH+AES256:RSA+AES256:EECDH+3DES:RSA+3DES:!MD5;
auth_basic “Restricted”;
auth_basic_user_file /home/tsmshops.com/private_html/tsmshops/.htpasswd;
location / {
autoindex on;
try_files $uri $uri/ /index.php;
}
location ~ \.php$ {
fastcgi_split_path_info ^(.+\.php)(/.+)$;
include /etc/nginx/fastcgi_params;
fastcgi_pass 127.0.0.1:9000;
fastcgi_index index.php;
fastcgi_connect_timeout 1000;
fastcgi_send_timeout 1000;
fastcgi_read_timeout 1000;
fastcgi_buffer_size 256k;
fastcgi_buffers 4 256k;
fastcgi_busy_buffers_size 256k;
fastcgi_temp_file_write_size 256k;
fastcgi_intercept_errors on;
fastcgi_param SCRIPT_FILENAME /home/tsmshops.com/private_html$fastcgi_script_name;
}
location ~ /\. {
deny all;
}
}
Mình thấy website truy cập bình thường, chắc bạn fix xong lỗi rồi?
em cũng bị lỗi tương tự mong anh hướng dẫn cách fix giúp em ạ
Mình muốn hiển thị có www như https://www.domain.com, chứ không phải https://domain.com thì phải thay đổi những chỗ nào ạ?
Bạn sửa server_name và rewrite nhé. Nếu mã nguồn WP thì yêu cầu website phải hoạt động trên www trước đã
Các bạn cho mình hỏi làm sao sửa lỗi này ạ
“An unexpected error occurred:
There were too many requests of a given type :: Error creating new order :: too many certificates already issued for exact set of domains: cr-agency.com,www.cr-agency.com: see https://letsencrypt.org/docs/rate-limits/
Please see the logfiles in /var/log/letsencrypt for more details.”
Em cảm ơn!
Lỗi Rate Limits, khi bạn issue quá nhiều chứng chỉ cho domain X trong tuần. Giới hạn sẽ tự gỡ bỏ sau thời gian trên
Help me admin! Mình tải code với base từ Vultr để chuyển sang DO. Cài lại hocvps script điền đúng domain. Đã trỏ domain về IP mới> sau đó mình vào abc/wp-admin thì lại không vào được. Nó vẫn chuyển sang https//abc/wp-admin và ko vào được. Bạn có biết lỗi do đâu không chỉ mình với
Hay là phải cài lại chứng chỉ ssl trên vps mới mới được bạn
Thế bạn phải cài SSL bên VPS mới rồi. Hoặc bạn đổi trình duyệt khi truy cập để vào wp-admin, do trình duyệt cũ ghi nhớ website dùng HTTPs rồi
Hi Admin,
Cho mình hỏi muốn xem thời giạn chứng chỉ Let’s Encrypt SSL thì làm thế nào? Lúc mình cài thì nó có hiện ra nhưng lúc gia hạn thì ko thấy hiện, chỉ báo gia hạn thành công thôi.
Bạn check qua https://www.ssllabs.com/ssltest/ nhé
Hoặc ấn vào địa chỉ web trên thanh công cụ, 1 bảng sẽ hiện ra
Mình dùng SSL của CLOUDFLARE và HOCVPS
***Mình sửa code:
server {
listen 80;
server_name http://www.shopchat.xyz;
rewrite ^(.*) http://shopchat.xyz$1 permanent;
}
***Thành:
server {
listen 80 default_server;
listen [::]:80 default_server;
server_name _;
return 301 https://$host$request_uri;
}
>>>THÌ BÁO LỖI “Error 521”
***Còn nếu đổi thành:
server {
listen 80;
listen [::]:80;
server_name shopchat.xyz;
return 301 https://$host$request_uri;
}
>>>THÌ BÁO LỖI “shopchat.xyz đã chuyển hướng bạn quá nhiều lần.”
Mình sai chổ nào chỉ giúp với @@. Thanks!
Hướng dẫn của HocVPs có như thế đầu. Bạn đọc lại nhé
server {
listen 2018 ssl;
access_log off;
log_not_found off;
error_log off;
root /home/hocvps.com/private_html;
index index.php index.html index.htm;
server_name hocvps.com;
error_page 497 https://$server_name:$server_port$request_uri;
ssl_certificate /etc/letsencrypt/live/hocvps.com/fullchain.pem;
ssl_certificate_key /etc/letsencrypt/live/hocvps.com/privkey.pem;
ssl_protocols TLSv1 TLSv1.1 TLSv1.2;
ssl_prefer_server_ciphers on;
ssl_ciphers EECDH+CHACHA20:EECDH+AES128:RSA+AES128:EECDH+AES256:RSA+AES256:EECDH+3DES:RSA+3DES:!MD5;
auth_basic “Restricted”;
auth_basic_user_file /home/hocvps.com/private_html/hocvps/.htpasswd;
===============================================================
mình cài ok hết nhưng xong thì không cách nào truy cập HocVPS Script Admin mặc dù đã truy cập qua IP:port, domanin.com:port , http, https,…
Ad cho mình hỏi cách khắc phục với. Thanks
Bạn post đúng nội dung của phần này nhé. Chỉnh sửa ntn mình không chắc bản gốc đúng đâu
Và port HocVPS ban đầu của bạn có phải 2018 không?
chào , mình vào “/etc/nginx/conf.d/domain.com.conf” thì báo lỗi “-bash: /etc/nginx/conf.d/domain.com.conf: Permission denied” . làm cách nào để khắc phục bạn ?
Bạn đọc lại phần hướng dẫn nhé. Chỉnh sửa nội dung file chứ không phải chạy file
Xin chào,
Vui lòng cho mình hỏi, mình có add thêm 1 website vào VPS và tiến hành cài đặt chứng chỉ Let’s Encrypt nhưng bị lỗi, mình đã xóa web đó đi nhưng vẫn không khởi động lại VPS được, trước đó mình có cài chứng chỉ Let’s Encrypt cho 2 web khác cùng VPS thì được.
[root@lifeshop2 home]# nginx -t
nginx: the configuration file /etc/nginx/nginx.conf syntax is ok
nginx: configuration file /etc/nginx/nginx.conf test is successful
[root@lifeshop2 home]# service nginx restart
Redirecting to /bin/systemctl restart nginx.service
Job for nginx.service failed because the control process exited with error code. See “systemctl status nginx.service” and “journalctl -xe” for details.
[root@lifeshop2 home]#
● nginx.service – nginx – high performance web server
Loaded: loaded (/usr/lib/systemd/system/nginx.service; enabled; vendor preset: disabled)
Active: failed (Result: exit-code) since Tue 2019-02-26 01:18:44 +07; 3min 22s ago
Docs: http://nginx.org/en/docs/
Process: 14735 ExecStop=/bin/kill -s TERM $MAINPID (code=exited, status=0/SUCCESS)
Process: 14691 ExecReload=/bin/kill -s HUP $MAINPID (code=exited, status=0/SUCCESS)
Process: 15652 ExecStart=/usr/sbin/nginx -c /etc/nginx/nginx.conf (code=exited, status=1/FAILURE)
Main PID: 15610 (code=exited, status=0/SUCCESS)
Feb 26 01:18:41 lifeshop2 nginx[15652]: nginx: [emerg] bind() to 0.0.0.0:80 …)
Feb 26 01:18:42 lifeshop2 nginx[15652]: nginx: [emerg] bind() to 0.0.0.0:80 …)
Feb 26 01:18:42 lifeshop2 nginx[15652]: nginx: [emerg] bind() to 0.0.0.0:80 …)
Feb 26 01:18:43 lifeshop2 nginx[15652]: nginx: [emerg] bind() to 0.0.0.0:80 …)
Feb 26 01:18:43 lifeshop2 nginx[15652]: nginx: [emerg] bind() to 0.0.0.0:80 …)
Feb 26 01:18:44 lifeshop2 systemd[1]: nginx.service: control process exited…=1
Feb 26 01:18:44 lifeshop2 nginx[15652]: nginx: [emerg] still could not bind()
Feb 26 01:18:44 lifeshop2 systemd[1]: Failed to start nginx – high performa…r.
Feb 26 01:18:44 lifeshop2 systemd[1]: Unit nginx.service entered failed state.
Feb 26 01:18:44 lifeshop2 systemd[1]: nginx.service failed.
Hint: Some lines were ellipsized, use -l to show in full.
[root@lifeshop2 home]#
Xin vui lòng chỉ mình cách khắc phục
Bạn cho mình kết quả của
# systemctl status nginx.service -l
# netstat -tulpn | grep 80
Nhìn qua thì port 80 đang bị chiếm. Bạn xóa web đó ntn?
Xin chào,
Cảm ơn bạn đã hỗ trợ, mình tìm kiếm thảo luận trong phần hỏi đáp và đã khắc phục được rồi.
Cho mình hỏi giờ mình muốn bỏ cái ssl comado chuyển qua thằng này thì cài như thế nào ạ
Bạn issue chứng chỉ Let’s như bình thường rồi sủa trong NGinx Conf trỏ đến đúng vị trí chứng chỉ Let’s
Hiện tại Nginx Conf đang trỏ đến chứng chỉ Comodo
Ở trên có phần “Tạo file DH parameters 2048 bit (tạo một lần duy nhất trên VPS)” cho mình hỏi lúc tạo cái ssl comado mình cũng tạo r vậy có cần tạo nữa k?
Không cần, bạn chỉ cần thay đường dẫn chứng chỉ Comodo bằng đường dẫn chứng chỉ Let’s thôi
Mình cấu hình file config giống y nhưng lại bị lỗi này “Job for nginx.service failed because the control process exited with error code. See “systemctl status nginx.service” and “journalctl -xe” for details.”
Là thế nào ad nhỉ? Mong bạn hướng dẫn giúp mình. Xin cảm ơn
nginx -t và systemctl status nginx -l của bạn ra kết quả gì
Muốn bỏ chứng chỉ cho 1 domain thì làm như nào vậy ad?
Bạn chỉnh sửa Nginx Conf về như ban đầu và để redirect từ HTTPS về HTTP
https://hocvps.com/cai-dat-chung-chi-ssl/comment-page-3/#comment-26049
Em muốn dùng dịch vụ cài đặt ssl mà liên hệ from mãi không thấy ai trả lời. Bác giúp em với
Mình đang gặp vấn đề khi chạy nodejs. Nếu cài SSL thì bị lỗi vì mình không thêm được cổng 3000. Ad có thể giúp mình k? Cảm ơn nhé
Bạn mở cổng 3000 chưa? https://ping.eu/port-chk/
sau khi nhập xong domain nó báo như này là bị làm sao ạ
IMPORTANT NOTES:
– The following errors were reported by the server:
Domain: ittest.binhanh.vn
Type: unauthorized
Detail: Invalid response from
http://ittest.binhanh.vn/.well-known/acme-challenge/4XtxvVqiJ4pAsvmb2_jEjTFuyeef4vpFl0nWpaA_gkU:
“\r\n<html
xmlns=\"http"
To fix these errors, please make sure that your domain name was
entered correctly and the DNS A/AAAA record(s) for that domain
contain(s) the right IP address.
– The following errors were reported by the server:
Domain: http://www.ittest.binhanh.vn
Type: None
Detail: DNS problem: NXDOMAIN looking up A for
http://www.ittest.binhanh.vn
Bạn trỏ www của domain về IP VPS chưa?
rồi ạ, làm các bước trên thì vẫn đúng đến phần này nó bảo như vậy
IP Khác nhau mà bạn?
Pinging www.ittest.binhanh.vn [125.235.4.59] with 32 bytes of data:Pinging ittest.binhanh.vn [14.232.243.194] with 32 bytes of data:
em mới tìm hiểu phần này nên vẫn còn gà mờ bác chỉ giúp em đc ko ạ, hay nếu rảnh bác teamview sửa giúp e với
Như mình nói ngay đầu đó, record www có trỏ về VPS X đâu? Bạn muốn tạo chứng chỉ trên VPS X thì record phải trỏ về VPS X
sau khi cài LEt’s thì không access vào filemanager được nữa
dù cố ACEPT port lại nhưng đâu lại vào đấy f2b-NoAuthFailures
Xin giúp đỡ mở lại port với ạ
f2b-NoAuthFailures tcp — 0.0.0.0/0 0.0.0.0/0 tcp dpt:8051
f2b-SSH tcp — 0.0.0.0/0 0.0.0.0/0 tcp dpt:2222
ACCEPT tcp — 0.0.0.0/0 0.0.0.0/0 tcp dpt:8051
ACCEPT tcp — 0.0.0.0/0 0.0.0.0/0 tcp dpt:8051
f2b-NoAuthFailures tcp — 0.0.0.0/0 0.0.0.0/0 tcp dpt:8051
f2b-SSH tcp — 0.0.0.0/0 0.0.0.0/0 tcp dpt:2222
ACCEPT tcp — 0.0.0.0/0 0.0.0.0/0 tcp dpt:8051
f2b-NoAuthFailures tcp — 0.0.0.0/0 0.0.0.0/0 tcp dpt:8051
f2b-SSH tcp — 0.0.0.0/0 0.0.0.0/0 tcp dpt:2222
ACCEPT tcp — 0.0.0.0/0 0.0.0.0/0 tcp dpt:8051
ACCEPT tcp — 0.0.0.0/0 0.0.0.0/0 tcp dpt:8051
f2b-NoAuthFailures tcp — 0.0.0.0/0 0.0.0.0/0 tcp dpt:8051
f2b-SSH tcp — 0.0.0.0/0 0.0.0.0/0 tcp dpt:2222
ACCEPT tcp — 0.0.0.0/0 0.0.0.0/0 tcp dpt:8051
f2b-NoAuthFailures tcp — 0.0.0.0/0 0.0.0.0/0 tcp dpt:8051
1. Bạn kiểm tra rule của Fail2Ban
https://hocvps.com/cai-dat-fail2ban-tren-centos/
2. Cho mình Nginx Conf bạn đã cài
Phần gia hạn tự động nên điều chỉnh lại 7 -> 8 giờ do SSL tính theo giờ GMT để không bị gián đoạn các bạn lưu ý chổ này
Crontab chạy theo giờ của VPS nên sẽ tùy thiết lập bên trong mà múi giờ sẽ khác nhau đó bạn
xin chào admin, mình có làm theo hướng dẫn đã chạy dc ssl cho domain chính, giờ muốn chạy cho domain khác nữa, mà làm theo lại ko dc. Đây là file conf ad có time xem giúp với. Thank admin.
server {
listen 443 ssl;
server_name http://www.cuthoc.com;
# SSL
ssl_certificate /etc/letsencrypt/live/cuthoc.com/fullchain.pem;
ssl_certificate_key /etc/letsencrypt/live/cuthoc.com/privkey.pem;
ssl_protocols TLSv1 TLSv1.1 TLSv1.2;
ssl_prefer_server_ciphers on;
ssl_ciphers EECDH+CHACHA20:EECDH+AES128:RSA+AES128:EECDH+AES256:RSA+AES256:EECDH+3DES:RSA+3DES:!MD5;
rewrite ^(.*) https://cuthoc.com$1 permanent;
}
server {
listen 80;
server_name cuthoc.com http://www.cuthoc.com;
rewrite ^(.*) https://cuthoc.com$1 permanent;}
server {
listen 443 ssl;
# access_log off;
access_log /home/cuthoc.com/logs/access.log;
# error_log off;
error_log /home/cuthoc.com/logs/error.log;
root /home/cuthoc.com/public_html;
index index.php index.html index.htm;
server_name cuthoc.com;
# SSL
ssl_certificate /etc/letsencrypt/live/cuthoc.com/fullchain.pem;
ssl_certificate_key /etc/letsencrypt/live/cuthoc.com/privkey.pem;
ssl_protocols TLSv1 TLSv1.1 TLSv1.2;
ssl_prefer_server_ciphers on;
ssl_ciphers EECDH+CHACHA20:EECDH+AES128:RSA+AES128:EECDH+AES256:RSA+AES256:EECDH+3DES:RSA+3DES:!MD5;
# Improve HTTPS performance with session resumption
ssl_session_cache shared:SSL:50m;
ssl_session_timeout 1d;
# DH parameters
ssl_dhparam /etc/nginx/ssl/dhparam.pem;
# Enable HSTS
add_header Strict-Transport-Security “max-age=31536000” always;
location / {
try_files $uri $uri/ /index.php?$args;
}
# Custom configuration
include /home/cuthoc.com/public_html/*.conf;
location ~ \.php$ {
fastcgi_split_path_info ^(.+\.php)(/.+)$;
include /etc/nginx/fastcgi_params;
fastcgi_pass 127.0.0.1:9000;
fastcgi_index index.php;
fastcgi_connect_timeout 1000;
fastcgi_send_timeout 1000;
fastcgi_read_timeout 1000;
fastcgi_buffer_size 256k;
fastcgi_buffers 4 256k;
fastcgi_busy_buffers_size 256k;
fastcgi_temp_file_write_size 256k;
fastcgi_intercept_errors on;
fastcgi_param SCRIPT_FILENAME $document_root$fastcgi_script_name;
}
location /nginx_status {
stub_status on;
access_log off;
allow 127.0.0.1;
allow 45.77.42.85;
deny all;
}
location /php_status {
fastcgi_pass 127.0.0.1:9000;
fastcgi_index index.php;
fastcgi_param SCRIPT_FILENAME $document_root$fastcgi_script_name;
include /etc/nginx/fastcgi_params;
allow 127.0.0.1;
allow 45.77.42.85;
deny all;
}
# Disable .htaccess and other hidden files
location ~ /\.(?!well-known).* {
deny all;
access_log off;
log_not_found off;
}
location = /favicon.ico {
log_not_found off;
access_log off;
}
location = /robots.txt {
allow all;
log_not_found off;
access_log off;
}
location ~* \.(3gp|gif|jpg|jpeg|png|ico|wmv|avi|asf|asx|mpg|mpeg|mp4|pls|mp3|mid|wav|swf|flv|exe|zip|tar|rar|gz|tgz|bz2|uha|7z|doc|docx|xls|xlsx|pdf|iso|eot|svg|ttf|woff)$ {
gzip_static off;
add_header Pragma public;
add_header Cache-Control “public, must-revalidate, proxy-revalidate”;
access_log off;
expires 30d;
break;
}
location ~* \.(txt|js|css)$ {
add_header Pragma public;
add_header Cache-Control “public, must-revalidate, proxy-revalidate”;
access_log off;
expires 30d;
break;
}
}
server {
listen 2323 ssl;
access_log off;
log_not_found off;
error_log /home/cuthoc.com/logs/nginx_error.log;
root /home/cuthoc.com/private_html;
index index.php index.html index.htm;
server_name cuthoc.com;
error_page 497 https://$server_name:$server_port$request_uri;
ssl_certificate /etc/letsencrypt/live/cuthoc.com/fullchain.pem;
ssl_certificate_key /etc/letsencrypt/live/cuthoc.com/privkey.pem;
ssl_protocols TLSv1 TLSv1.1 TLSv1.2;
ssl_prefer_server_ciphers on;
ssl_ciphers EECDH+CHACHA20:EECDH+AES128:RSA+AES128:EECDH+AES256:RSA+AES256:EECDH+3DES:RSA+3DES:!MD5;
auth_basic “Restricted”;
auth_basic_user_file /home/cuthoc.com/private_html/cuthoc/.htpasswd;
location / {
autoindex on;
try_files $uri $uri/ /index.php;
}
location ~ \.php$ {
fastcgi_split_path_info ^(.+\.php)(/.+)$;
include /etc/nginx/fastcgi_params;
fastcgi_pass 127.0.0.1:9000;
fastcgi_index index.php;
fastcgi_connect_timeout 1000;
fastcgi_send_timeout 1000;
fastcgi_read_timeout 1000;
fastcgi_buffer_size 256k;
fastcgi_buffers 4 256k;
fastcgi_busy_buffers_size 256k;
fastcgi_temp_file_write_size 256k;
fastcgi_intercept_errors on;
fastcgi_param SCRIPT_FILENAME $document_root$fastcgi_script_name;
}
location ~ /\. {
deny all;
}
}
Mình thấy bthg, bạn fix xong rồi?
Và note là website phụ (không phải website chính cài HOCVPS) thì không cấu hình phần HocVPS Admin
Bác Việt Phương cho em hỏi, e check file log le-renew.log mấy ngày gần đây thì nó hiển thị log như bên dưới là bị sao vậy bác?
– – – – – – – – – – – – – – – – – – – – – – – – – – – – – – – – – – – – – – – –
Processing /etc/letsencrypt/renewal/domain.com.conf
– – – – – – – – – – – – – – – – – – – – – – – – – – – – – – – – – – – – – – – –
– – – – – – – – – – – – – – – – – – – – – – – – – – – – – – – – – – – – – – – –
All renewal attempts failed. The following certs could not be renewed:
/etc/letsencrypt/live/domain.com/fullchain.pem (failure)
– – – – – – – – – – – – – – – – – – – – – – – – – – – – – – – – – – – – – – – –
IMPORTANT NOTES:
– The following errors were reported by the server:
Domain: wwww.domain.com
Type: None
Detail: DNS problem: NXDOMAIN looking up A for
wwww.domain.com
Không renew được chứng chỉ vì record www của domain không trỏ về VPS
Rõ ràng là e có trỏ về nha nhỉ 🙁
Nó báo như vậy mà bạn. Có thể bạn bật cloudflare của record ý
em không dùng cloudflare…hjhj..để e thử xóa rồi thêm lại coi ntn @@
e phát hiện cái sai rồi tại sao lại mà 4 wwww nhỉ
Domain: wwww.domain.com
Type: None
Detail: DNS problem: NXDOMAIN looking up A for
wwww.domain.com
Do qúa trình bạn gõ thôi, vậy chắc bạn tạo cả chứng chỉ cho record
wwwwBạn có thể tạo record wwww trỏ về IP VPS hoặc xóa cert đi tạo lại chỉ www và non-www
Cảm ơn bác…e đã xóa cert và tạo lại 🙂
Luân ơi cho mình hỏi:
Mình chuyển WordPress sang VPS mới, cài SSL ok mà bị lỗi sau:
1. Vào trang quản trị https://pandora.com/wp-admin/ thì nó chạy có SLL
2. Còn vào trang Front-end https://pandorahoteldn.com thì nó không chạy, gõ http://pandorahoteldn.com không có ssl thì nó chạy bình thường.
Mình check thấy bình thường mà nhỉ. Thấy HTTP redirect sang HTTPS rồi
http://prntscr.com/m9wobq
Thank Ad,
Mình bị dính cache trang chủ, mình xóa cache thì thấy ok rồi. 😀
Hi ad,
Mình cài thành công, hiện tại vẫn đang chạy ổn định.
Giờ mình chuyển VPS khác (domain vẫn như cũ) thì có cần xóa SSL trên VPS này rồi qua VPS mới cài lại không, hay để y vậy qua kia cài lại.
Thank ad.
Không cần xóa bạn nhé. Sang VPs mới tạo chứng chỉ lại là được
Ok thank ad nhiềi
Xin chào Admin,
Cho mình hỏi, tính năng chặn iframe của nginx sao lại không hoạt động sau khi cài SSL? Mình sử dụng script hocvps và cài ssl thành công theo bài hướng dẫn này. Cấu hình chặn iframe trong file nginx.conf vẫn được giữ nguyên “add_header X-Frame-Options SAMEORIGIN”
Xin chào
Sau khi mình cài xong ssl thì không vào được phần filemaneger, phpmyadmin nữa.Nó báo lỗi “403 Forbidden nginx”. bạn có thể hướng dẫn mình sửa được không?