Chỉ với một vài thao tác nhỏ, bạn có thể tăng tốc website lên nhiều lần so với hiện tại. Tại sao không thử nhỉ?

Trong bài viết trước mình đã giới thiệu về HTTP/2 và những lợi ích mà nó mang lại. Ngay từ bây giờ, bạn đã có thể áp dụng giao thức HTTP/2 cho website của mình rồi đó.
Một điều lưu ý nhỏ là HTTP/2 chỉ hoạt động khi cả web server và trình duyệt cùng hỗ trợ giao thức, nếu không kết nối sẽ tự động quay lại HTTP/1.1.
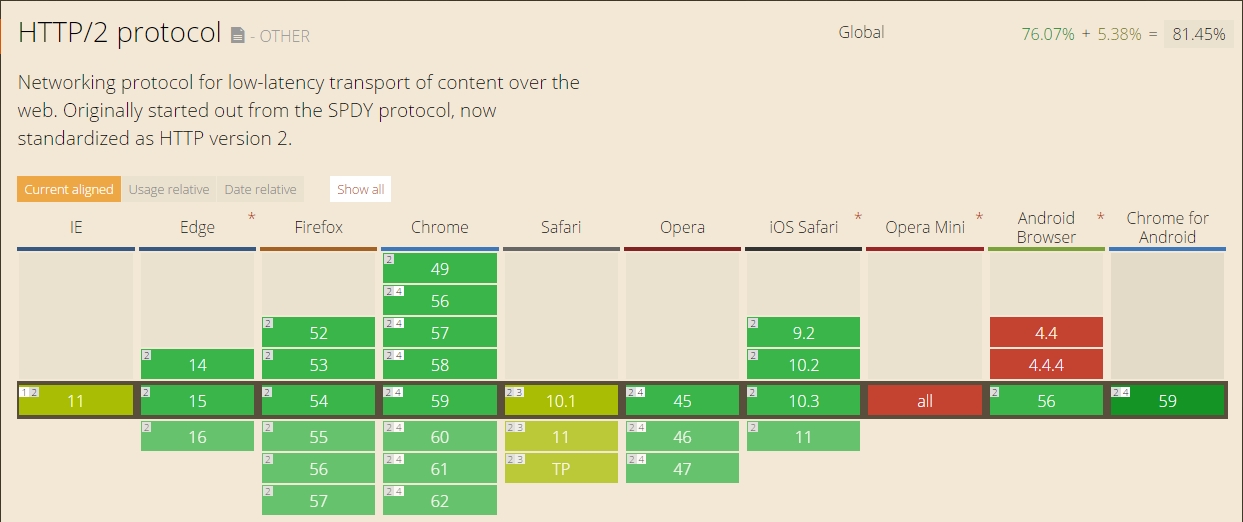
– Về phương diện trình duyệt, các trình duyệt phổ biến như Chrome, Firefox, Edge, Safari… đều đã hỗ trợ giao thức HTTP/2 (kiểm tra tại CanIUse). Tuy vậy, tất cả lại chỉ hỗ trợ HTTP/2 qua kết nối SSL/TLS.
Như vậy, để tận hưởng lợi ích của HTTP/2, website cần phải sử dụng SSL.
– Về phương diện Hosting/Server, ngoài SSL, bạn cần đảm bảo hệ thống webserver đã thiết lập HTTP/2 và hỗ trợ tương tác bằng ALPN (Application-Layer Protocol Negotiation)
Nếu bạn dùng Hosting, hãy liên hệ hỏi nhà cung cấp cho chắc chắn. Với StableHost, Hawk Host, AZDIGI thì yên tâm dùng mà không cần hỏi.
Nếu bạn dùng VPS/Cloud Server, hãy kích hoạt SSL, HTTP/2 cho webserver thông qua các giao thức trực tiếp/module cài đặt (cụ thể tùy vào từng loại webserver). Để như vậy, VPS bạn cần có OpenSSL v1.0.2 trở lên.
Kiểm tra OpenSSL
# openssl version
OpenSSL 1.0.2k-fips  26 Jan 2017
Bài viết này mình sẽ hướng dẫn thiết lập HTTP/2 trên VPS sử dụng Nginx webserver (ví dụ HocVPS, Centmin Mod…) tương thích với các trình duyệt phổ biến hiện nay. Bạn cần:
- Biên dịch mã nguồn Nginx tích hợp OpenSSL phiên bản 1.0.2 trở lên (làm 1 lần duy nhất)
- Cấu hình SSL HTTP/2 trong Nginx Conf
Nội dung bài viết
1. Tích hợp OpenSSL vào Nginx
Bạn cần tích hợp OpenSSL bằng cách biên dịch lại mã nguồn Nginx. HocVPS lựa chọn phiên bản OpenSSL 1.1.1g để tích hợp vào Nginx 1.18.0. Tham khảo các phiên bản khác tại Nginx Download và OpenSSL Source.
Lưu ý: tùy từng phiên bản Nginx bạn sẽ cần phiên bản OpenSSL phù hợp mới sử dụng được.
1.1. Chuẩn bị
– Kiểm tra thông tin Nginx. Thời điểm hiện tại, HocVPS sử dụng Nginx 1.18.0 tích hợp OpenSSL 1.0.2k-fips cùng với các tham số Configure Arguments như phần bôi đỏ. Bạn sẽ cần copy lại các tham số này để tiến hành biên dịch lại Nginx ở bước sau.
# nginx -V
nginx version: nginx/1.18.0
built by gcc 4.8.5 20150623 (Red Hat 4.8.5-39) (GCC)
built with OpenSSL 1.0.2k-fips  26 Jan 2017
TLS SNI support enabled
configure arguments: --prefix=/etc/nginx --sbin-path=/usr/sbin/nginx --modules-path=/usr/lib64/nginx/modules --conf-path=/etc/nginx/nginx.conf --error-log-path=/var/log/nginx/error.log --http-log-path=/var/log/nginx/access.log --pid-path=/var/run/nginx.pid --lock-path=/var/run/nginx.lock --http-client-body-temp-path=/var/cache/nginx/client_temp --http-proxy-temp-path=/var/cache/nginx/proxy_temp --http-fastcgi-temp-path=/var/cache/nginx/fastcgi_temp --http-uwsgi-temp-path=/var/cache/nginx/uwsgi_temp --http-scgi-temp-path=/var/cache/nginx/scgi_temp --user=nginx --group=nginx --with-compat --with-file-aio --with-threads --with-http_addition_module --with-http_auth_request_module --with-http_dav_module --with-http_flv_module --with-http_gunzip_module --with-http_gzip_static_module --with-http_mp4_module --with-http_random_index_module --with-http_realip_module --with-http_secure_link_module --with-http_slice_module --with-http_ssl_module --with-http_stub_status_module --with-http_sub_module --with-http_v2_module --with-mail --with-mail_ssl_module --with-stream --with-stream_realip_module --with-stream_ssl_module --with-stream_ssl_preread_module --with-cc-opt='-O2 -g -pipe -Wall -Wp,-D_FORTIFY_SOURCE=2 -fexceptions -fstack-protector-strong --param=ssp-buffer-size=4 -grecord-gcc-switches -m64 -mtune=generic -fPIC' --with-ld-opt='-Wl,-z,relro -Wl,-z,now -pie'
– Tải và cài đặt các thành phần cần thiết: mã nguồn Nginx 1.18.0, mã nguồn OpenSSL 1.1.1g mới nhất cùng các trình biên dịch.
# yum install gcc-c++ pcre-devel zlib-devel epel-release -y
# cd /usr/local/src
# wget http://nginx.org/download/nginx-1.18.0.tar.gz && tar -xzvf nginx-1.18.0.tar.gz
# wget https://www.openssl.org/source/openssl-1.1.1g.tar.gz && tar -xzvf openssl-1.1.1g.tar.gz
1.2. Biên dịch Nginx
– Truy cập thư mục Nginx vừa tải để cấu hình mã nguồn với lệnh ./configure cùng toàn bộ tham số Nginx ban đầu (đề cập bước 1.1) và thêm vào --with-openssl=/usr/local/src/openssl-1.1.0g
Lưu ý: Để biên dịch, bạn cần 512MB RAM trở lên (bao gồm cả Swap)
# cd nginx-1.18.0
# ./configure --prefix=/etc/nginx --sbin-path=/usr/sbin/nginx --modules-path=/usr/lib64/nginx/modules --conf-path=/etc/nginx/nginx.conf --error-log-path=/var/log/nginx/error.log --http-log-path=/var/log/nginx/access.log --pid-path=/var/run/nginx.pid --lock-path=/var/run/nginx.lock --http-client-body-temp-path=/var/cache/nginx/client_temp --http-proxy-temp-path=/var/cache/nginx/proxy_temp --http-fastcgi-temp-path=/var/cache/nginx/fastcgi_temp --http-uwsgi-temp-path=/var/cache/nginx/uwsgi_temp --http-scgi-temp-path=/var/cache/nginx/scgi_temp --user=nginx --group=nginx --with-compat --with-file-aio --with-threads --with-http_addition_module --with-http_auth_request_module --with-http_dav_module --with-http_flv_module --with-http_gunzip_module --with-http_gzip_static_module --with-http_mp4_module --with-http_random_index_module --with-http_realip_module --with-http_secure_link_module --with-http_slice_module --with-http_ssl_module --with-http_stub_status_module --with-http_sub_module --with-http_v2_module --with-mail --with-mail_ssl_module --with-stream --with-stream_realip_module --with-stream_ssl_module --with-stream_ssl_preread_module --with-cc-opt='-O2 -g -pipe -Wall -Wp,-D_FORTIFY_SOURCE=2 -fexceptions -fstack-protector --param=ssp-buffer-size=4 -m64 -mtune=generic -fPIC' --with-ld-opt='-Wl,-z,relro -Wl,-z,now -pie' --with-openssl=/usr/local/src/openssl-1.1.1g
Kết quả hiển thị như dưới là thành công:
Configuration summary
  + using threads
  + using system PCRE library
  + using OpenSSL library: /usr/local/src/openssl-1.1.1g
  + using system zlib library

  nginx path prefix: "/etc/nginx"
  nginx binary file: "/usr/sbin/nginx"
  nginx modules path: "/usr/lib64/nginx/modules"
  nginx configuration prefix: "/etc/nginx"
  nginx configuration file: "/etc/nginx/nginx.conf"
  nginx pid file: "/var/run/nginx.pid"
  nginx error log file: "/var/log/nginx/error.log"
  nginx http access log file: "/var/log/nginx/access.log"
  nginx http client request body temporary files: "/var/cache/nginx/client_temp"
  nginx http proxy temporary files: "/var/cache/nginx/proxy_temp"
  nginx http fastcgi temporary files: "/var/cache/nginx/fastcgi_temp"
  nginx http uwsgi temporary files: "/var/cache/nginx/uwsgi_temp"
  nginx http scgi temporary files: "/var/cache/nginx/scgi_temp"
– Chạy lệnh phía dưới để tiến hành compile Nginx.
# make
Đợi tầm 3-5 phút để tiến trình thành công là bạn có thể sử dụng bộ Nginx đã được biên dịch thủ công để làm Webserver.
1.3. Thay thế Nginx
– Tiến hành thay thế Nginx trên VPS bằng Nginx vừa được biên dịch lại:
# mv /usr/sbin/nginx /usr/sbin/nginx.bak
# cp objs/nginx /usr/sbin/nginx
# service nginx restart
– Kiểm tra lại nếu thấy thông tin như bên dưới là thành công.
# nginx -V
nginx version: nginx/1.18.0
built by gcc 4.8.5 20150623 (Red Hat 4.8.5-39) (GCC)
built with OpenSSL 1.1.1g  21 Apr 2020
TLS SNI support enabled
configure arguments: --prefix=/etc/nginx --sbin-path=/usr/sbin/nginx --modules-path=/usr/lib64/nginx/modules --conf-path=/etc/nginx/nginx.conf --error-log-path=/var/log/nginx/error.log --http-log-path=/var/log/nginx/access.log --pid-path=/var/run/nginx.pid --lock-path=/var/run/nginx.lock --http-client-body-temp-path=/var/cache/nginx/client_temp --http-proxy-temp-path=/var/cache/nginx/proxy_temp --http-fastcgi-temp-path=/var/cache/nginx/fastcgi_temp --http-uwsgi-temp-path=/var/cache/nginx/uwsgi_temp --http-scgi-temp-path=/var/cache/nginx/scgi_temp --user=nginx --group=nginx --with-compat --with-file-aio --with-threads --with-http_addition_module --with-http_auth_request_module --with-http_dav_module --with-http_flv_module --with-http_gunzip_module --with-http_gzip_static_module --with-http_mp4_module --with-http_random_index_module --with-http_realip_module --with-http_secure_link_module --with-http_slice_module --with-http_ssl_module --with-http_stub_status_module --with-http_sub_module --with-http_v2_module --with-mail --with-mail_ssl_module --with-stream --with-stream_realip_module --with-stream_ssl_module --with-stream_ssl_preread_module --with-cc-opt='-O2 -g -pipe -Wall -Wp,-D_FORTIFY_SOURCE=2 -fexceptions -fstack-protector-strong --param=ssp-buffer-size=4 -grecord-gcc-switches -m64 -mtune=generic -fPIC' --with-ld-opt='-Wl,-z,relro -Wl,-z,now -pie' --with-openssl=/usr/local/src/openssl-1.1.1g
2. Cấu hình SSL HTTP/2 trong Nginx Conf
Webserver Nginx trên hệ thống của bạn đã sẵn sàng thiết lập giao thức HTTP/2 giữa Server và Browser. Bạn cần kích hoạt giao thức HTTP2 kèm SSL trong cấu hình Nginx của mỗi site.
Bạn sửa cấu hình Nginx trong block server {…} như sau (chỉnh sửa đối với từng website trong hệ thống).
listen 443 ssl http2;
Bên cạnh đó, bạn nên cấu hình nâng cao SSL như hướng dẫn cài đặt chứng chỉ SSL hoặc Let’s Encrypt
3. Kiểm tra
Để kiểm tra, các bạn sử dụng công cụ Developer Tools của trình duyệt hoặc kiểm tra qua website.
Kiểm tra trực tiếp các kết nối trình duyệt tới website với công cụ Developer Tools F12 (trình duyệt nào cũng có). Như bạn đã thấy, HocVPS đã dùng HTTP/2, thời gian load lần đầu homepage chỉ là 2.33s.
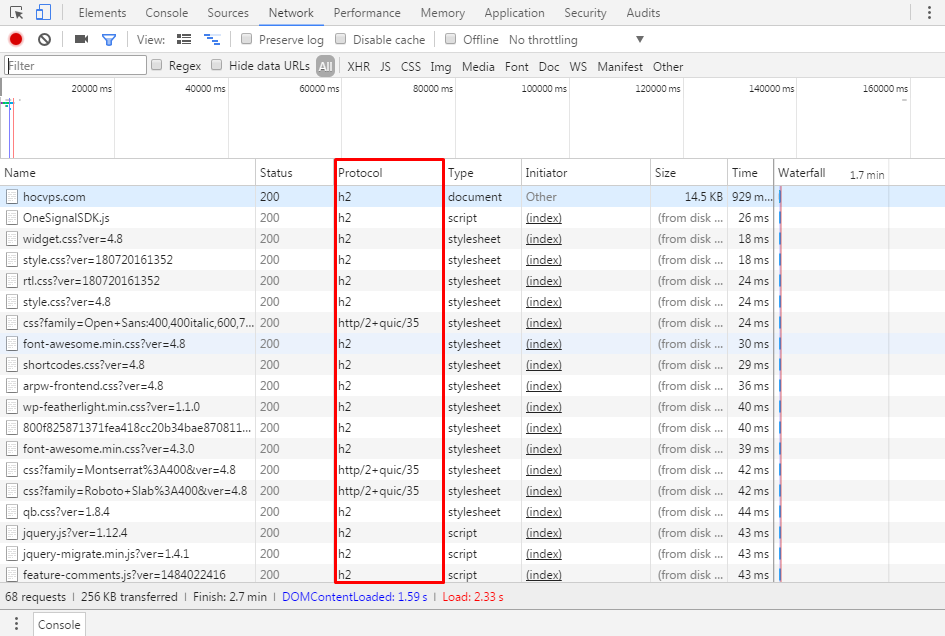
Lưu ý: Một số phần mềm Antivirus chặn HTTP/2 Protocol nên cần kiểm tra cả ở máy tính khác và check cả Firefox và Chrome.
- Với Chrome, nếu không thấy tab Protocol, bạn hãy nhấn chuột phải ở menu để kích hoạt.
- Với Firefox, các bạn check tab Header trong Network sẽ thấy Version: HTTP/2.0
Bên cạnh đó, bạn có thể kiếm tra qua website HTTP2.pro. Kết quả tích hợp HTTP/2 kèm ALPN là ok.

Hi vọng với bài viết hướng dẫn này, các bạn có thể kích hoạt kết nối giao thức HTTP/2 cho website của mình. Nếu có điều gì thắc mắc, hãy để lại comment bên dưới nhé.
uạ sao web mình xem chỗ protocol thì có cái http/1.1 có cái thì http/ 2 là sao nhỉ… check ở /http2.pro thì nó báo đã là http/2
Tùy từng đối tượng nên không cụ thể và ổn định nhé bạn
Mình làm theo thì website bị lỗi từ chối kết nối. Và không vào được phpmyadmin luôn ạ. 🙁
Có ai cứu với .
nginx -tvàservice nginx statuscủa bạn có kêt quả gìCủa mình đây ad ạ 🙁
# nginx -t
nginx: the configuration file /etc/nginx/nginx.conf syntax is ok
nginx: [emerg] bind() to 45.124.87.15:80 failed (99: Cannot assign requested address)
nginx: configuration file /etc/nginx/nginx.conf test failed
———-
# service nginx status
Redirecting to /bin/systemctl status nginx.service
● nginx.service – The nginx HTTP and reverse proxy server
Loaded: loaded (/etc/systemd/system/nginx.service; enabled; vendor preset: disabled)
Active: failed (Result: exit-code) since Wed 2017-11-22 15:50:06 +07; 9s ago
Process: 2188 ExecStartPre=/usr/sbin/nginx -t -c /etc/nginx/nginx.conf (code=exited, status=1/FAILURE)
Nov 22 15:50:06 vps.bkcloud.vn systemd[1]: Starting The nginx HTTP and rever….
Nov 22 15:50:06 vps.bkcloud.vn nginx[2188]: nginx: the configuration file /e…k
Nov 22 15:50:06 vps.bkcloud.vn nginx[2188]: nginx: [emerg] bind() to 45.124….)
Nov 22 15:50:06 vps.bkcloud.vn nginx[2188]: nginx: configuration file /etc/n…d
Nov 22 15:50:06 vps.bkcloud.vn systemd[1]: nginx.service: control process ex…1
Nov 22 15:50:06 vps.bkcloud.vn systemd[1]: Failed to start The nginx HTTP an….
Nov 22 15:50:06 vps.bkcloud.vn systemd[1]: Unit nginx.service entered failed….
Nov 22 15:50:06 vps.bkcloud.vn systemd[1]: nginx.service failed.
Hint: Some lines were ellipsized, use -l to show in full.
service nginx status -lbạn. Mà lỗi bạn còn không assign được IP. Cho mình cả kết quả củanginx -VDạ đây ad ạ 🙁
Redirecting to /bin/systemctl status nginx.service
● nginx.service – The nginx HTTP and reverse proxy server
Loaded: loaded (/etc/systemd/system/nginx.service; enabled; vendor preset: disabled)
Active: failed (Result: exit-code) since Wed 2017-11-22 15:58:07 +07; 2s ago
Process: 2942 ExecStartPre=/usr/sbin/nginx -t -c /etc/nginx/nginx.conf (code=exited, status=1/FAILURE)
Nov 22 15:58:07 vps.bkcloud.vn systemd[1]: Starting The nginx HTTP and rever….
Nov 22 15:58:07 vps.bkcloud.vn nginx[2942]: nginx: the configuration file /e…k
Nov 22 15:58:07 vps.bkcloud.vn nginx[2942]: nginx: [emerg] bind() to 45.124….)
Nov 22 15:58:07 vps.bkcloud.vn nginx[2942]: nginx: configuration file /etc/n…d
Nov 22 15:58:07 vps.bkcloud.vn systemd[1]: nginx.service: control process ex…1
Nov 22 15:58:07 vps.bkcloud.vn systemd[1]: Failed to start The nginx HTTP an….
Nov 22 15:58:07 vps.bkcloud.vn systemd[1]: Unit nginx.service entered failed….
Nov 22 15:58:07 vps.bkcloud.vn systemd[1]: nginx.service failed.
Hint: Some lines were ellipsized, use -l to show in full.
[root@vps ~]# service nginx status -l
Redirecting to /bin/systemctl status -l nginx.service
● nginx.service – The nginx HTTP and reverse proxy server
Loaded: loaded (/etc/systemd/system/nginx.service; enabled; vendor preset: disabled)
Active: failed (Result: exit-code) since Wed 2017-11-22 15:58:07 +07; 48s ago
Process: 2942 ExecStartPre=/usr/sbin/nginx -t -c /etc/nginx/nginx.conf (code=exited, status=1/FAILURE)
Nov 22 15:58:07 vps.bkcloud.vn systemd[1]: Starting The nginx HTTP and reverse proxy server…
Nov 22 15:58:07 vps.bkcloud.vn nginx[2942]: nginx: the configuration file /etc/nginx/nginx.conf syntax is ok
Nov 22 15:58:07 vps.bkcloud.vn nginx[2942]: nginx: [emerg] bind() to 45.124.87.15:80 failed (99: Cannot assign requested address)
Nov 22 15:58:07 vps.bkcloud.vn nginx[2942]: nginx: configuration file /etc/nginx/nginx.conf test failed
Nov 22 15:58:07 vps.bkcloud.vn systemd[1]: nginx.service: control process exited, code=exited status=1
Nov 22 15:58:07 vps.bkcloud.vn systemd[1]: Failed to start The nginx HTTP and reverse proxy server.
Nov 22 15:58:07 vps.bkcloud.vn systemd[1]: Unit nginx.service entered failed state.
Nov 22 15:58:07 vps.bkcloud.vn systemd[1]: nginx.service failed.
Bạn gửi VPs qua support@hocvps.com mình xem cho. Nghi là thiếu package rồi
Còn đây là nginx -V ạ
nginx version: nginx/1.13.3
built by gcc 4.8.5 20150623 (Red Hat 4.8.5-16) (GCC)
built with OpenSSL 1.0.2k-fips 26 Jan 2017
TLS SNI support enabled
configure arguments: –add-module=../modsecurity_nginx-2.9.0/nginx/modsecurity –user=nginx –group=nginx –prefix=/usr –sbin-path=/usr/sbin –conf-path=/etc/nginx/nginx.conf –pid-path=/var/run/nginx.pid –http-log-path=/var/log/nginx/access_log –error-log-path=/var/log/nginx/error_log –with-ipv6 –without-mail_imap_module –without-mail_smtp_module –with-http_ssl_module –with-http_realip_module –with-http_stub_status_module –with-http_gzip_static_module –with-http_dav_module –with-http_v2_module –with-cc-opt=”-D FD_SETSIZE=32768”
Bạn nên làm theo đúng hướng dẫn nhé. Các phiên bản OpenSSL mới nhất và Nginx mới nhất chưa hề được test nên không đảm bảo độ tương thích
Cũng như việc HocVPs dùng nginx stable, tức 1.12.x không sử dụng Nginx mainline (1.13.x)
Dạ. mình có gửi mail cho ad rồi ạ. Vì lúc cài là mình cài bản 1.13.1. Lúc bị lỗi mình mới tải bản mới nhất về để cứt vãn tình thế ạ 🙁
Hướng dẫn sử dụng Nginx Stable 1.12.x bạn à
Bạn ơi,,
Nếu check nginx với thông số như dưới thì có cần biên dịch lại ko bạn:
nginx version: nginx/1.12.2
built by gcc 4.8.5 20150623 (Red Hat 4.8.5-16) (GCC)
built with OpenSSL 1.0.2k-fips 26 Jan 2017
Thanks
Bạn cứ dùng các công cụ test HTTP/2 bên dưới là rõ mà. Mình đoán là không.
Phiên bản hiện tại của nginx -V mình đang chạy là
nginx version: nginx/1.12.2 thì cài tích hợp OpenSSL v?? vậy ad?
1.1.0f nhé bạn
Lỗi này xuất hiện sau lệnh # make ạ, cho mình hỏi fix như thế nào?
src/http/ngx_http_header_filter_module.c:49:3: error: invalid preprocessing directive #static
# static u_char ngx_http_server_string[] = “Server: nginx” CRLF;
^
src/http/ngx_http_header_filter_module.c:50:3: error: invalid preprocessing directive #static
# static u_char ngx_http_server_full_string[] = “Server: ” NGINX_VER CRLF;
^
src/http/ngx_http_header_filter_module.c:51:3: error: invalid preprocessing directive #static
# static u_char ngx_http_server_build_string[] = “Server: ” NGINX_VER_BUILD CRLF;
Mình chưa định hướng ra được lỗi bạn do gì.
1. Hệ thống bạn là gì
2. Bạn post full câu lệnh
./configurecủa bạn raMình dùng hocvps mới nhất đó bạn, có cài varnish, x-page-speed, đây là full lệnh sau khi thực thi ok mình dùng lệnh # make thì bị lỗi như trên:
./configure –prefix=/etc/nginx –sbin-path=/usr/sbin/nginx –modules-path=/usr/lib64/nginx/modules –conf-path=/etc/nginx/nginx.conf –error-log-path=/var/log/nginx/error.log –http-log-path=/var/log/nginx/access.log –pid-path=/var/run/nginx.pid –lock-path=/var/run/nginx.lock –http-client-body-temp-path=/var/cache/nginx/client_temp –http-proxy-temp-path=/var/cache/nginx/proxy_temp –http-fastcgi-temp-path=/var/cache/nginx/fastcgi_temp –http-uwsgi-temp-path=/var/cache/nginx/uwsgi_temp –http-scgi-temp-path=/var/cache/nginx/scgi_temp –user=nginx –group=nginx –with-compat –with-file-aio –with-threads –with-http_addition_module –with-http_auth_request_module –with-http_dav_module –with-http_flv_module –with-http_gunzip_module –with-http_gzip_static_module –with-http_mp4_module –with-http_random_index_module –with-http_realip_module –with-http_secure_link_module –with-http_slice_module –with-http_ssl_module –with-http_stub_status_module –with-http_sub_module –with-http_v2_module –with-mail –with-mail_ssl_module –with-stream –with-stream_realip_module –with-stream_ssl_module –with-stream_ssl_preread_module –with-cc-opt=’-O2 -g -pipe -Wall -Wp,-D_FORTIFY_SOURCE=2 -fexceptions -fstack-protector-strong –param=ssp-buffer-size=4 -grecord-gcc-switches -m64 -mtune=generic -fPIC’ –with-ld-opt=’-Wl,-z,relro -Wl,-z,now -pie’ –with-openssl=/usr/local/src/openssl-1.1.0g –add-module=/usr/local/src/ngx_pagespeed-1.12.34.3-stable
nginx 1.13.6 đó bạn
Các phiên bản mới nhất chưa đảm bảo tích hợp với nhau đâu bạn. Bạn dùng Nginx Stable nhé. Và hình như bạn hiểu 1.13 là mới hơn 1.12 ?
Bạn đọc thêm về 2 dòng Nginx nhé https://www.nginx.com/blog/nginx-1-6-1-7-released/
Trong code mình thấy bạn dùng cả OpenSSL 1.1.0g
Vừa make nginx 1.12.2 và đã thành công với HTTP/2 thông tin đến anh em nào đang định nâng cấp lên Nginx 1.12.2 nhé.
Well noted with thanks 😀 Do bản 1.12.2 mới ra 17/10 nên mình đang để thời gian theo dõi và sẽ update vào bài viết sớm nhất có thể
Ở bước 2, nếu site k có ssl thì có kích hoạt đc HTTP/2 không ạ?
Không bạn nhé, HTTP/2 đi cùng với SSL như trong bài viết đã note
để tận hưởng lợi ích của HTTP/2, website cần phải sử dụng SSL.
Hi Anh cho em hỏi:
Hôm trước em có add domain nhưng lỗi gì đó không được nên đã xoá domain đi. Sau hnay restart lại VPS thì gặp lỗi như sau và không vào được web.
sudo nginx -t
nginx: the configuration file /etc/nginx/nginx.conf syntax is ok
nginx: [emerg] open() “/home/tenmien.vn/logs/access.log” failed (2: No such file or directory)
nginx: configuration file /etc/nginx/nginx.conf test failed
Em đã thử: touch /home/tenmien.vn/logs/access.log nhưng vẫn không có gì xảy ra. Nginx hình như không chạy.
Nhờ anh hướng dẫn cách xử lí.
Sau bạn tạo website bằng menu thì xóa bằng menu nhé, vì 1 website hoạt động không chỉ có source code mà còn có virtual host quy định
Bạn kiểm tra trong /etc/nginx/conf.d còn cấu hình của website đó thì xóa đi
Cám ơn bạn .
Giờ xu hướng là phải https nên kết hợp cái này nữa là ngon luôn.
Phần bôi đỏ chổ tham số nginx, mình copy của mình, hay là copy phần trên bài viết?
Mình copy phần của mình thì nó báo như sau
/////
./configure –user=nginx –group=nginx –prefix=/usr –sbin-path=/usr/sbin –conf-path=/etc/nginx/nginx.conf –pid-path=/var/run/nginx.pid –http-log-path=/var/log/nginx/access_log –error-log-path=/var/log/nginx/error_log –with-ipv6 –without-mail_imap_module –without-mail_smtp_module –with-http_ssl_module –with-http_realip_module –with-http_stub_status_module –with-http_gzip_static_module –with-http_dav_module –with-cc-opt=”-D FD_SETSIZE=32768” –with-openssl=/usr/local/src/openssl-1.1.0f
/////
Lỗi =====>
./configure: error: invalid option “FD_SETSIZE=32768”
Giúp mình với.
Mình đã sửa được lỗi kia, nó thay dấu ngoặc kép bằng 2 dấu ngoặc đơn, tuy nhiên khi thay thế nginx thì mình gặp lỗi
cp: cannot stat `objs/nginx’: No such file or directory
Đây là thông tin xuất hiện trước khi gõ lệnh “make”
Configuration summary
+ using system PCRE library
+ using OpenSSL library: /usr/local/src/openssl-1.1.0f
+ using system zlib library
nginx path prefix: “/usr”
nginx binary file: “/usr/sbin”
nginx modules path: “/usr/modules”
nginx configuration prefix: “/etc/nginx”
nginx configuration file: “/etc/nginx/nginx.conf”
nginx pid file: “/var/run/nginx.pid”
nginx error log file: “/var/log/nginx/error_log”
nginx http access log file: “/var/log/nginx/access_log”
nginx http client request body temporary files: “client_body_temp”
nginx http proxy temporary files: “proxy_temp”
nginx http fastcgi temporary files: “fastcgi_temp”
nginx http uwsgi temporary files: “uwsgi_temp”
nginx http scgi temporary files: “scgi_temp”
================== và các thông số khi gõ “nginx -V” của mình
–user=nginx –group=nginx –prefix=/usr –sbin-path=/usr/sbin –conf-path=/etc/nginx/nginx.conf –pid-path=/var/run/nginx.pid –http-log-path=/var/log/nginx/access_log –error-log-path=/var/log/nginx/error_log –with-ipv6 –without-mail_imap_module –without-mail_smtp_module –with-http_ssl_module –with-http_realip_module –with-http_stub_status_module –with-http_gzip_static_module –with-http_dav_module –with-cc-opt=”-D FD_SETSIZE=32768″ –with-openssl=/usr/local/src/openssl-1.1.0f
1. Bạn copy phần của bạn, thêm đoạn sau vào cuối
--with-http_v2_module --with-openssl=/usr/local/src/openssl-1.1.0f2. Và bạn nhớ phần FD_SETSIZE=32768 copy y nguyên trên SSH, đừng gõ vì mình nhìn thì hình như dấu
'bị sửa thành"Cụ thể nó là :
--with-cc-opt='-D FD_SETSIZE=32768'"đúng rồi, nó bị cái dấu ngoặc, giờ mình bị cái lỗi như ở trên mình comment
1. Bạn rebuild thêm
httpv2module đi2. Bạn
makexong thìmake installlà được. Bởi mình đoán bạn đang không chạy lệnhcpở trong thư mục build nên nó sẽ không tìm thấy thư mụcobjs/nginxmình hiện chưa biết rebuild httpv2, mình make install như bạn nói thì
//////
make -f objs/Makefile install

make[1]: Entering directory `/usr/local/src/nginx-1.12.1'

test -d '/usr' || mkdir -p '/usr'

test -d '/usr' \

                || mkdir -p '/usr'

test ! -f '/usr/sbin' \

                || mv '/usr/sbin' \

                        '/usr/sbin.old'

cp objs/nginx '/usr/sbin'

cp: cannot create regular file `/usr/sbin/nginx': Text file busy

make[1]: *** [install] Error 1

make[1]: Leaving directory `/usr/local/src/nginx-1.12.1'

make: *** [install] Error 2
/////
có cần chạy 3 lệnh này nữa không
# mv /usr/sbin/nginx /usr/sbin/nginx.bak# cp objs/nginx /usr/sbin/nginx
# service nginx restart
1. Comment trên nữa mình có ghi đó, lúc compile với trường hợp DirectAdmin bạn cần
--with-http_v2_module --with-openssl=/usr/local/src/openssl-1.1.0f2. Lỗi rồi. Bạn cần stop nginx trước khi chạy
make installHoặc nếu dùng 3 lệnh trong bài hướng dẫn thì bạn phải đảm bảo lệnh được chạy khi bạn đang ở thư mục
/usr/local/src/nginx-1.12.1Thì khi đó bên trong nó mới tồn tại thư mục
objs/nginxMình đã cài thành công, cám ơn mod. Lát đi kiêm hướng dẫn chỉnh sửa file bằng nano nữa :v
Cho mình hỏi, trong
/etc/nginxmình không thấyconf.dđâu cả?1.Cách sử dụng Nano editor
2. Mình nghĩ DirectAdmin nó đặt Nginx Conf của các site trong 1 file .conf duy nhất. Nên bạn mở tất cả các file trong /etc/nginx/ đọc xem file nào quy định các server_name là chính file đó. Mà Direct ADmin dùng Nginx là reserve proxy cho Apache thì phải
Mình đã thấy mấy file conf đó, nó nằm tuốt trong đây
/usr/local/directadmin/data/users/minhkhang/nginx.conf. Mình check bằng sitehttp2.prothì OK, nhưng F12 trên chrome thì toàn http 1/1. Bạn xem 2 hình mình gửi kèm nhé.https://prnt.sc/ghulywhttps://prnt.sc/ghumazDo trình duyệt bạn thôi. Bạn clear cache đi rồi thử lại: http://prntscr.com/gi251b
Mình thấy toàn speedy với h2
Cám ơn Phương, giờ mình qua bài tối ưu https cho nginx :v
Cho mình hỏi, nếu dùng lệnh
nginx -v chỉ cho ra mỗi 1 dòng là : nginx version: nginx/1.12.1
Chứ nó không cho đầy đủ thông tin ở trên
nginx -Vnhé bạnvẫn giống dòng lệnh mà mình dùng mà: nginx -v
V viết hoa bạn ơi
:D, ah, thank you
Mình ko nhìn thấy:D
Giờ ngon lành rồi
https://prnt.sc/gac0eg
Của mình báo PUSH: No là sao nhỉ?
Mình dùng directadmin họ cài sẵn hay sao đó!
Tức sever bạm không hỗ trợ HTTP/2 Push. Bạn có thể tham khảo thêm trên mạng ý nghĩa tham số này
mình cài cái này thì nó lỗi bạn à. bạn có thể xem qua cho mình không. mình newbie
https://pastebin.com/5yX4s461
mình làm đến 1.3 thì lỗi bạn à, giờ web hết vào dược nữa
Sao Nginx -V lại command not found? Như vậy chẳng nhẽ VPS bạn không có Nginx hoặc không phải sử dụng Nginx? Rồi bước build trc bạn hiện thông báo gì?
Bước 1.2 thì vẫn báo đúng theo trình tự. Không mình sử dụng ngnix mà
Anh ơi giờ có Nginx ver 1.12.1 rồi, cho em hỏi là sau khi em update lên em có biên dịch lại bản 1.12.1 được không và nếu được anh cho em xin link wget bản 1.12.1 được không ạ. Em cảm ơn ạ.
Bạn có thể tải tại nginx: download. Bạn compile luôn với bản 1.12.1 rồi thay vào Nginx trong VPS. Bạn nên backup site trước đó. Phiên bản này mình chưa test nên không rõ các module gốc có tích hợp đc để compile không
Thôi thế em đợi khi nào ổn định có người test vậy hehee, Tại giờ web cũng tương đối là nhanh rồi 😀
Mình test xong rồi nhé Đã update bài viết. Bạn có thể áp dụng luôn
Mình chưa làm gì nhưng vẫn thấy server mình đã hỗ trợ http/2 rồi theo cách kiểm tra của bạn. Kiểm tra trên server thì mới chỉ OpenSSL 1.01e thôi. Nên suy ra thì lên SSL là nó vẫn nhận http/2 rồi phải không?
Uhm, nếu bạn kiểm tra Developer Tools thấy
h2hết là OKMình cài SSL và HTTP2 mọi thứ đều ổn nhưng không thể truy cập site WordPress của mình được bạn check dùm mình conf với:
server {
listen 443 ssl http2;
server_name taive.online;
# SSL
ssl_certificate /etc/letsencrypt/live/taive.online-0001/fullchain.pem;
ssl_certificate_key /etc/letsencrypt/live/taive.online/privkey.pem;
ssl_protocols TLSv1 TLSv1.1 TLSv1.2;
ssl_prefer_server_ciphers on;
ssl_ciphers EECDH+CHACHA20:EECDH+AES128:RSA+AES128:EECDH+AES256:RSA+AES256:EECDH+3DES:RSA+3DES:!MD5;
# Improve HTTPS performance with session resumption
ssl_session_cache shared:SSL:50m;
ssl_session_timeout 1d;
# DH parameters
ssl_dhparam /etc/nginx/ssl/dhparam.pem;
# Enable HSTS
add_header Strict-Transport-Security “max-age=31536000” always;
rewrite ^(.*) https://taive.online$1 permanent;
}
server {
listen 80;
# access_log off;
access_log /home/taive.online/logs/access.log;
# error_log off;
error_log /home/taive.online/logs/error.log;
root /home/taive.online/public_html;
index index.php index.html index.htm;
server_name taive.online;
# Custom configuration
include /home/taive.online/public_html/*.conf;
location / {
try_files $uri $uri/ /index.php?$args;
}
location ~ \.php$ {
fastcgi_split_path_info ^(.+\.php)(/.+)$;
include /etc/nginx/fastcgi_params;
fastcgi_pass 127.0.0.1:9000;
fastcgi_index index.php;
fastcgi_connect_timeout 300;
fastcgi_send_timeout 300;
fastcgi_read_timeout 300;
fastcgi_buffer_size 32k;
fastcgi_buffers 8 16k;
fastcgi_busy_buffers_size 32k;
fastcgi_temp_file_write_size 32k;
fastcgi_intercept_errors on;
fastcgi_param SCRIPT_FILENAME /home/taive.online/public_html$fastcgi_script_name;
}
location ~ /\. {
deny all;
}
location = /favicon.ico {
log_not_found off;
access_log off;
}
location = /robots.txt {
allow all;
log_not_found off;
access_log off;
}
location ~* \.(3gp|gif|jpg|jpeg|png|ico|wmv|avi|asf|asx|mpg|mpeg|mp4|pls|mp3|mid|wav|swf|flv|exe|zip|tar|rar|gz|tgz|bz2|uha|7z|doc|docx|xls|xlsx|pdf|iso|eot|svg|ttf|woff)$ {
gzip_static off;
add_header Pragma public;
add_header Cache-Control “public, must-revalidate, proxy-revalidate”;
access_log off;
expires 30d;
break;
}
location ~* \.(txt|js|css)$ {
add_header Pragma public;
add_header Cache-Control “public, must-revalidate, proxy-revalidate”;
access_log off;
expires 30d;
break;
}
}
Bạn cấu hình sai rồi. Bạn xem lại cấu hình mẫu trong bài viết rồi sửa nhé.
Block 443 đầu tiên của bạn redirect về chính nó. Xong block 80 thì lại show nội dung web
Thanks bạn mình đã làm được 🙂
mình test ở trang http2.pro thì thông báo ok hết, nhưng chỗ PUSH (bên dưới ALPN) thì nó thông báo là NO
We could not find any resources being pushed. If there are no resources that might benefit from HTTP/2 Push feature, ignore this.
Có ai biết là lý do gì ko ạ?
Đã cài đặt thành công rồi mà khi kiểm tra trên trình duyệt thì một số thành phần vẫn đang dùng http1 nhỉ vd như ảnh, css, javascript.. 🙁
Check trên https://http2.pro thì cái PUSH lúc thì using lúc thì no là sao ạ
Bạn kiểm tra cả trình duyệt khác nhé. Như mình note có thể do trình duyệt/anti virus của máy chặn protocol H2. Nên trên http2.pro check H2 vs ALPN là ok
Mình nhìn thì phần lớn css js ảnh bạn qua HTTP/2 rồi, số ít qua HTTP/1.1
Trang mình check là trang khác bác ạ. 🙂
Dù sao cũng cảm ơn bác
Hiện tại Push không hỗ trợ Nginx bạn nhé
nếu ram 512mb 1gb cpu thì có nên cài http2 , https không ad?
Mình thấy không vấn đề gì bạn. Mình dùng VPS ram 512MB cho vài website vẫn http2 và https bình thường
Ram512 vẫn ok lúc issue certs Let’s Encrypt nhé bạn
Mình ko hiểu lắm ở mục 1.2 biên dịch nginx, làm sao để truy cập vào và cấu hình
Bạn biên dịch lại Nginx trên mã nguồn vừa tải về ở bước 1.1. chứ không phải biên dịch lại Nginx trên VPS
Cảm ơn bạn, mình đã làm được rồi
Nginx cu cua minh la: nginx version: nginx/1.0.15
Sau khi build nginx mới theo hướng dẫn, chép vào /usr/sbin/nginx và restart thì bị lỗi
nginx: [alert] version 1.12.0 of nginx.pm is required, but 1.0.15 was found
nginx: configuration file /etc/nginx/nginx.conf test failed
Hệ thống bạn đang có cả 2 Nginx. Bạn cho mình kết quả của
yum list installed nginx*vàyum list nginx*[root@cloud ~]# yum list installed nginx*
Loaded plugins: fastestmirror
Loading mirror speeds from cached hostfile
* base: mirror.qoxy.com
* epel: epel.mirror.angkasa.id
* extras: mirror.qoxy.com
* updates: mirror.qoxy.com
* webtatic: sp.repo.webtatic.com
Error: No matching Packages to list
[root@cloud ~]# yum list nginx*
Loaded plugins: fastestmirror
Loading mirror speeds from cached hostfile
* base: mirror.qoxy.com
* epel: epel.mirror.angkasa.id
* extras: mirror.qoxy.com
* updates: mirror.qoxy.com
* webtatic: sp.repo.webtatic.com
Error: No matching Packages to list
[root@cloud ~]#
Ơ, thế này chẳng nhẽ VPS bạn không có Nginx gì?
Có chứ sao không bác?
[root@cloud ~]# nginx -V
nginx version: nginx/1.0.15
built by gcc 4.4.7 20120313 (Red Hat 4.4.7-11) (GCC)
TLS SNI support enabled
configure arguments: –prefix=/usr/share/nginx –sbin-path=/usr/sbin/nginx –conf-path=/etc/nginx/nginx.conf –error-log-path=/var/log/nginx/error.log –http-log-path=/var/log/nginx/access.log –http-client-body-temp-path=/var/lib/nginx/tmp/client_body –http-proxy-temp-path=/var/lib/nginx/tmp/proxy –http-fastcgi-temp-path=/var/lib/nginx/tmp/fastcgi –http-uwsgi-temp-path=/var/lib/nginx/tmp/uwsgi –http-scgi-temp-path=/var/lib/nginx/tmp/scgi –pid-path=/var/run/nginx.pid –lock-path=/var/lock/subsys/nginx –user=nginx –group=nginx –with-file-aio –with-ipv6 –with-http_ssl_module –with-http_realip_module –with-http_addition_module –with-http_xslt_module –with-http_image_filter_module –with-http_geoip_module –with-http_sub_module –with-http_dav_module –with-http_flv_module –with-http_mp4_module –with-http_gzip_static_module –with-http_random_index_module –with-http_secure_link_module –with-http_degradation_module –with-http_stub_status_module –with-http_perl_module –with-mail –with-mail_ssl_module –with-debug –with-cc-opt=’-O2 -g -pipe -Wall -Wp,-D_FORTIFY_SOURCE=2 -fexceptions -fstack-protector –param=ssp-buffer-size=4 -m64 -mtune=generic’ –with-ld-opt=-Wl,-E
[root@cloud ~]# cat /etc/issue
CentOS release 6.8 (Final)
Kernel \r on an \m
Bạn gửi VPS qua support@hocvps.com mình xem cho
À, VPS của mình đang chạy vài site quan trọng nên sorry bác. Để mình tự mò tiếp ạ.
Cám ơn bác đã support. Em tìm ra vấn đề là mình phải update cả perl nữa. Em bỏ cái config –with-http_perl_module thì chạy được rồi. Tới lúc thêm http2 vào config file của web thì lại bị thiếu the “http2” parameter requires ngx_http_v2_module
Đang compile lại với cái đó.
Về cơ bản hướng dẫn của bác chắc chỉ phù hợp với VPS cài hocvps script 😀 mình thì tự cài, tự custom nên nó khác ạ.
Done 😀 https://http2.pro/check?url=https%3A//ledsieure.com/
Cám ơn bài viết của thớt nhiều :3
Hoặc có thể do chênh phiên bản Nginx quá nhiều. Khi đó, một số module đã thay đổi, không còn duy trì ở Nginx phiên bản tiếp theo.
Well noted with thanks 😀 Site bạn nghiên cứu xem nốt cái HTTP/2 Push đi
Mình không dùng HTTPS thì có dùng được giao thức HTTP/2 không
Không bạn nhé. Các trình duyệt chấp nhận HTTP2 kết hợp SSL bạn à
Thông báo đã làm được trên Vestacp theo hướng dẫn trên. Lưu ý làm tất cả các bước trên. Nhưng không cần thực hiện bước này “Cấu hình SSL HTTP/2 trong Nginx Conf” nhé. Vì bước này không cần thiết trên vestacp theo mình!
Ok bạn. Để note cho các bạn dùng VestaCP. Vậy VestaCP chỉ cần compile lại Nginx còn không cần cấu hình trong Conf
http2à bạnĐúng rồi Mod. Mình dung Vestacp + Cloudflare. Cài theo hướng dẫn trên.
Sau khi thực hiện xong bước này “1.3. Nâng cấp Nginx” thì đã ok.
Mình không cần làm thêm bước này “2. Cấu hình SSL HTTP/2 trong Nginx Conf”
mình dùng HTTPS của Cloudflare thì cài có giống từng bước với toàn bộ bài viết không ad nhỉ? với hocvps có OpenSSL hay mình phải cài thêm vào.
tks
Bạn dùng HocVPS vẫn cần tích hợp lại OpenSSL để dùng HTTP/2 nhé. Còn SSL Cloudare cho HTTPS thì mình không rõ. Bạn thử xem
tks bạn.
Mình dùng HTTPS của Cloudflare + Hocvps. Và cài theo ok rui`!
Các bạn lưu ý. Mình không hiểu sao kích hoạt thành công rồi nhưng chrome vẫn là http 1.1 nên mình chuyển qua kiểm tra trên firefox được http 2.0 nhé các bạn.
Ad nên note vụ này để anh em đỡ hỏi 😀
Đã làm xong và vẫn là http 1.1 hức
Kết quả kiểm tra qua https://http2.pro/ của bạn ntn. Rồi cả nginx -v
Anh ơi, em thực hiện và thành công rồi các file request như js hay css thì đều chạy chạy h2 hết, nhưng các file ảnh thì vẫn là 1.1 do không xử lí h2 được cho file ảnh hay là do em làm thiếu hả anh?
Bạn có thể kiểm tra canhme hay hocvps thấy các file ảnh đều H2. Và nếu như js hay css đều H2 tức H2 đã được thiết lập giữa webserver và browser rồi.
Bạn có thể kiểm tra ở các browser máy khác cho chắc ăn hoặc xem lại code. Mình chưa thấy ghi nhận gì về case ntn
Em nhầm bác ạ, do em chưa test kỹ hóa ra là do Cache trình duyệt, giờ tất cả load ngon h2 rồi.
Ok bạn. Nhanh hơn giai đoạn HTTP/1.1 không?
Em đang cái cho comodo, cho em hỏi em đang dùng hocvps thì có cần update nginx và cài đặt open sll không ạ
Có bạn nhé. Bản chất là Nginx đã update rồi, mình cần biên soạn lại để tích hợp với OpenSSL phiên bản mới
Cảm ơn anh nhiều nhé, em đã cài thành công 😀
không biết hocvps bản cũ có làm đc ko nhỉ? Thử bản mới thì ok rồi, chưa dám thử trên bản cũ, sợ lỗi thì mệt.
đã thử trên bản cũ, bạn nào cần thì làm theo quy trình này
Bước đầu chỉ cần update nginx mới nhất 1.12 là đc, sau đó làm theo hướng dẫn ở trên là thành công.
Bạn backup site với database rồi tiến hành nhé
Cảm ơn hướng dẫn của bạn. Đã thực hiện và đã thành công!
Mình sử dụng VestaCP trên CentOS Linux 7.3 x64
– SSL of Let’s Encrypt
– NGINX 1.13.2 mainline
– PHP 7.1.7RC1
– MariaDB Ver 15.1 Distrib 10.2.6-MariaDB
Oh. Bạn compile lại với Nginx 1.13 à? VestaCP thì chỉ cần compile lại còn bước cấu hình SSL thì không cần?
uk, mình compile lại nginx 1.13.2 còn cấu hình ssl thì không bắt buộc, nhưng muốn có cấu hình ssl tùy chỉnh thì có thể tự cấu hình thêm và nó không ảnh hưởng đến giao thức http2
OK noted. Thực ra vì nhiều trình duyệt chỉ hỗ trợ HTTP/2 qua SSL nên bắt buộc dùng HTTP/2 cùng SSL bạn à
Nếu webserver của bạn dùng Nginx làm frontend template và php-fpm làm backend đồng thời bản Nginx đã được compile lại bằng OpenSSL từ v1.0.2 trở lên thì mặc định đã được khai báo protocol http2 qua openssl trong core của nginx rồi, cho nên không cần phải khai báo lại lần nữa thông qua file nginx.conf. Đây là mình thử nghiệm nhiều lần trên nginx + php-fpm còn với các trường hợp của apache thì mình không rõ.
Ok bạn. Cám ơn nhé
Bạn biết cách nâng cấp Apache + Nginx cho VestaCP chỉ mình với! 😀
Theo nhiều comment của các bạn thì VestaCP chỉ cần thực hiện bước 1. Tích hợp OpenSSL 1.1.0f vào Nginx là ok nhé bạn
Nâng cấp theo ý bạn là nâng cấp phiên bản à? Cái này thì tùy OS nhé. Bạn dùng OS nào?
Mình dùng CentOS 7 , VestaCP WebServer Nginx_Apache
Mình muốn nâng cấp Nginx vơi Apache lên bản mới nhất đó bạn
+ Đối với Nginx, bạn dùng FTP hoặc SSH client đăng nhập, truy cập theo đường dẫn /etc/yum.repos.d/ sau đó chỉnh sửa nội dung file nginx.repo theo bên dưới:
[nginx]
name=nginx repo
baseurl=http://nginx.org/packages/mainline/centos/7/$basearch/
gpgcheck=0
enabled=1
Sau khi lưu lại thì đăng nhập SSH với quyền root hoặc sudo chạy lệnh ‘yum update nginx -y’ thì sẽ được cập nhật lên phiên bản Nginx mới nhất (Mainline 1.13.2). Khởi động lại Nginx ‘systemctl restart nginx’
Bản Mainline là bản mới nhất được phát hành chính thức nhưng có thể sẽ không hoạt động ổn định nên bạn cân nhắc khi nâng cấp. Phiên bản ổn định mới nhất là 1.12
+ Đối với apache, khi cài đặt vestacp trên centos 7 thì đã được tích hợp bản bản ổn định mới nhất là 2.4 rồi. Mình khuyên bạn không nên chỉnh sửa hoặc nâng cấp gì thêm.
+ Đối với PHP, bạn có thể nâng cấp lên bản mới nhất là 7.1.7 bằng cách truy cập theo đường dẫn /etc/yum.repos.d/ kiểm tra thử xem đã có file ‘remi-php71.repo’ trong này chưa. Có rồi thì sữa lại theo nộ dung bên dưới ,chưa có thì tạo, sau đó copy toàn bộ nội dung bên dưới dán vào sau đó lưu lại. Đăng nhập SSH (root or sudo) chạy lệnh yum update -y để cập nhật lên bản PHP mới nhất. Khởi động lại Apache ‘systemctl restart httpd’
Nội dung file remi-php71.repo
—–
# This repository only provides PHP 7.1 and its extensions
# NOTICE: common dependencies are in “remi-safe”
[remi-php71]
name=Remi’s PHP 7.1 RPM repository for Enterprise Linux 7 – $basearch
#baseurl=http://rpms.remirepo.net/enterprise/7/php71/$basearch/
#mirrorlist=https://rpms.remirepo.net/enterprise/7/php71/httpsmirror
mirrorlist=http://rpms.remirepo.net/enterprise/7/php71/mirror
enabled=1
gpgcheck=1
gpgkey=file:///etc/pki/rpm-gpg/RPM-GPG-KEY-remi
[remi-php71-debuginfo]
name=Remi’s PHP 7.1 RPM repository for Enterprise Linux 7 – $basearch – debuginfo
baseurl=http://rpms.remirepo.net/enterprise/7/debug-php71/$basearch/
enabled=1
gpgcheck=1
gpgkey=file:///etc/pki/rpm-gpg/RPM-GPG-KEY-remi
[remi-php71-test]
name=Remi’s PHP 7.1 test RPM repository for Enterprise Linux 7 – $basearch
#baseurl=http://rpms.remirepo.net/enterprise/7/test71/$basearch/
#mirrorlist=https://rpms.remirepo.net/enterprise/7/test71/httpsmirror
mirrorlist=http://rpms.remirepo.net/enterprise/7/test71/mirror
enabled=1
gpgcheck=1
gpgkey=file:///etc/pki/rpm-gpg/RPM-GPG-KEY-remi
[remi-php71-test-debuginfo]
name=Remi’s PHP 7.1 test RPM repository for Enterprise Linux 7 – $basearch – debuginfo
baseurl=http://rpms.remirepo.net/enterprise/7/debug-test71/$basearch/
enabled=1
gpgcheck=1
gpgkey=file:///etc/pki/rpm-gpg/RPM-GPG-KEY-remi
Nếu chỉ nâng cấp Nginx mà ko nâng cấp Apache thì sử dụng được HTTP2 ko bạn nhỉ?
Bạn check xem apache phiên bản trên máy chủ của bạn là bao nhiêu? Nếu từ 2.4.17 trở lên thì được nha bạn. Bạn tham khảo thêm bài viết này https://geekflare.com/http2-implementation-apache-nginx/
Phiền bạn chỉ mình nâng cấp MariaDB với Apache luôn nha 😀
+ Bạn đang dùng phiên bản mariadb hay mysql nào?
+ Mình không dùng Apache nên không hướng dẫn chi tiết được, bạn tham khảo thêm các bài hướng dẫn khác trên mạng nhé.
Mặc định khi cài VestaCP trên CentOS 7 thì tự động cài MariaDB 5.5 đó bạn
Giờ mình muốn nâng cấp lên MariaDB 10.1 đó bạn 😀
+ Đối với MariaDB, đầu tiên bạn sửa file repo theo đường dẫn /etc/yum.repos.d/MariaDB.repo
Nếu chưa có file MariaDB.repo thì tạo sau đó dán hoặc thay thế toàn bộ nội dung bên dưới sau đó lưu lại, lưu ý đây là repo cho Centos 7 x64 và phiên bản mariadb ổn định (Stable 10.2) mới nhất
# MariaDB 10.2 CentOS repository list – created 2017-06-25 22:53 UTC
# http://downloads.mariadb.org/mariadb/repositories/
[mariadb]
name = MariaDB
baseurl = http://yum.mariadb.org/10.2/centos7-amd64
gpgkey=https://yum.mariadb.org/RPM-GPG-KEY-MariaDB
gpgcheck=1
– Tạm dừng mysql
service mysql stop
– Bắt đầu cập nhật repo
yum update
– Kích hoạt lại mysql
service mysql start
– Nâng cấp cơ sở dữ liệu
mysql_upgrade -u root -p
Mật khẩu root mặc định của myslq chính là mật khẩu root của VPS nếu bạn chưa từng thay đổi.
Bạn nâng cấp thử đi, quá trình nâng cấp có thể có lỗi, nếu có lỗi gì thì post lên đây mình xem.
Cảm ơn bạn nhiều nhé!
Quá trình nâng cấp Mariadb có thể sẽ gặp lỗi phiên bản cũ không được tự động gỡ bỏ để thay thế bằng phiên bản mới.
Lúc đó, bạn cần nâng cấp thủ công bằng cách gỡ bỏ phiên bản cũ qua terminal, rồi cài đặt thủ công phiên bản mới.
Bạn có thể tham khảo bài viết này: https://support.qualityunit.com/009608-Upgrade-MariaDB-100x-to-MariaDB-101x-on-Centos-yum
Chạy đến bước 1.2 , nó không trả về kết quả thành công như trong bài. Mà nó ra như này:
checking for OS
+ Linux 2.6.32-573.8.1.el6.i686 i686
checking for C compiler … found
+ using GNU C compiler
+ gcc version: 4.4.7 20120313 (Red Hat 4.4.7-18) (GCC)
checking for gcc -pipe switch … found
checking for -Wl,-E switch … found
checking for gcc builtin atomic operations … not found
checking for C99 variadic macros … found
checking for gcc variadic macros … found
checking for gcc builtin 64 bit byteswap … found
checking for unistd.h … found
checking for inttypes.h … found
checking for limits.h … found
checking for sys/filio.h … not found
checking for sys/param.h … found
checking for sys/mount.h … found
checking for sys/statvfs.h … found
checking for crypt.h … found
checking for Linux specific features
checking for epoll … found
checking for EPOLLRDHUP … found
checking for EPOLLEXCLUSIVE … not found
checking for O_PATH … not found
checking for sendfile() … found
checking for sendfile64() … found
checking for sys/prctl.h … found
checking for prctl(PR_SET_DUMPABLE) … found
checking for sched_setaffinity() … found
checking for crypt_r() … found
checking for sys/vfs.h … found
checking for poll() … found
checking for /dev/poll … not found
checking for kqueue … not found
checking for crypt() … not found
checking for crypt() in libcrypt … found
checking for F_READAHEAD … not found
checking for posix_fadvise() … found
checking for O_DIRECT … found
checking for F_NOCACHE … not found
checking for directio() … not found
checking for statfs() … found
checking for statvfs() … found
checking for dlopen() … not found
checking for dlopen() in libdl … found
checking for sched_yield() … found
checking for SO_SETFIB … not found
checking for SO_REUSEPORT … found
checking for SO_ACCEPTFILTER … not found
checking for SO_BINDANY … not found
checking for IP_BIND_ADDRESS_NO_PORT … not found
checking for IP_TRANSPARENT … found
checking for IP_BINDANY … not found
checking for IP_RECVDSTADDR … not found
checking for IP_PKTINFO … found
checking for IPV6_RECVPKTINFO … found
checking for TCP_DEFER_ACCEPT … found
checking for TCP_KEEPIDLE … found
checking for TCP_FASTOPEN … not found
checking for TCP_INFO … found
checking for accept4() … found
checking for kqueue AIO support … not found
checking for Linux AIO support … found
checking for int size … 4 bytes
checking for long size … 4 bytes
checking for long long size … 8 bytes
checking for void * size … 4 bytes
checking for uint32_t … found
checking for uint64_t … found
checking for sig_atomic_t … found
checking for sig_atomic_t size … 4 bytes
checking for socklen_t … found
checking for in_addr_t … found
checking for in_port_t … found
checking for rlim_t … found
checking for uintptr_t … uintptr_t found
checking for system byte ordering … little endian
checking for size_t size … 4 bytes
checking for off_t size … 8 bytes
checking for time_t size … 4 bytes
checking for AF_INET6 … found
checking for setproctitle() … not found
checking for pread() … found
checking for pwrite() … found
checking for pwritev() … found
checking for sys_nerr … found
checking for localtime_r() … found
checking for posix_memalign() … found
checking for memalign() … found
checking for mmap(MAP_ANON|MAP_SHARED) … found
checking for mmap(“/dev/zero”, MAP_SHARED) … found
checking for System V shared memory … found
checking for POSIX semaphores … not found
checking for POSIX semaphores in libpthread … found
checking for struct msghdr.msg_control … found
checking for ioctl(FIONBIO) … found
checking for struct tm.tm_gmtoff … found
checking for struct dirent.d_namlen … not found
checking for struct dirent.d_type … found
checking for sysconf(_SC_NPROCESSORS_ONLN) … found
checking for openat(), fstatat() … found
checking for getaddrinfo() … found
configuring additional dynamic modules
adding module in njs-1c50334fbea6/nginx
./configure: error: no njs-1c50334fbea6/nginx/config was found
Bạn dùng VestaCP à? Cái module
njs-1c50334fbea6/nginxbạn xóa đi và thêm thành--add-dynamic-module=/usr/local/src/njs-1c50334fbea6/nginxMình dùng hocvps bạn ơi.
Bạn fix như mình bảo đó. Mà HocVPS bạn phiên bản nào?
Ok. Để mình thử xem sao.
Hocvps của mình phiên bản cũ, cài cách đây 1 năm.
mình đang dùng hocvps v1.6
mình đã thử lại, nhưng vẫn lỗi như trên: http://prntscr.com/fputiz
Lần đầu mình cài, mình không hiểu, nên đã copy luôn phần này của ad http://prntscr.com/fpusl2 . Lần 2, mình cài lại đúng theo hướng dẫn và phát sinh lỗi như trên. Không biết có phải đây là nguyên nhân không nhỉ!
Bạn gửi VPS qua support@hocvps.com mình xem cho
Done. Do Nginx phiên bản trong VPS v1.10 và Nginx v1.12 không còn module njs nên mình đã tải về từ http://hg.nginx.org/njs/ để tích hợp luôn giúp bạn rồi
Bạn có thể thêm hướng dẫn ở trên dành cho phiên bản hocvps cũ, dùng nginx v1.10 được ko ạ?
Bên mình không còn duy trì HocVPS phiên bản cũ. Cũng như việc dùng Nginx phiên bản cũ mình thấy không giúp ích vấn đề gì ở đây
Mặc dù, quá trình có thể vẫn thế, mục đích là tích hợp OpenSSL phiên bản trên 1.0.2 vào Nginx
mình thấy cloudflare có chức năng này mà?
nếu xài cloudflare rồi thì có cần cài trên vps nữa không? (có cài hocvpsscript)
Bạn giúp mình kiểm tra qua Development Tool xem Protocol của website qua HTTP/2 không?
Cài Nginx mới nhất thì không cần biên dịch
Không bạn à. Do vấn đề của OS có hỗ trợ trong OpenSSL nữa không. Nên bạn cài đặt Nginx mới nhất cũng thế. Hiện có Ubuntu 16.04 mới cài đặt Nginx được luôn
Bạn có thể tham khảo : https://www.nginx.com/blog/supporting-http2-google-chrome-users/
Mình đã làm OK mà vẫn thấy HTTP 1.1 🙁
Cho mình kết quả của
nginx -Vvà cấu hình Nginx Conf của domain của bạn. Gửi qua https://pastebin.com/ cho gọnBạn check email admin@hocvps.com nha 🙂
Hệ thống HTTP/2 bình thường.
Noted: Các bạn cài đặt xong có thể check online trên https://http2.pro. Đảm bảo website sử dụng HTTP/2 support ALPN
Ngoài ra, một số trình duyệt không hỗ trợ hoặc chương trình AntiVirus trong máy có thể block protocol H2
Kể cả Let’s Encrypt cũng được hả anh.
Được nhé bạn!
Uhm bạn. Như mình đã note đó.
web của em dùng SSL free và vestacp có cài cái này được ko bác Luân
VetaCP dùng cả Apache kết hợp Nginx nên mình không chắc rồi bạn
VestaCP thì mình không rõ bước kích hoạt HTTP/2. Còn SSL free dùng được thoải mái
Bạn có thể tham khảo hướng dẫn trên Debian8 : https://forum.vestacp.com/viewtopic.php?t=12522
Cho xin hướng dẫn cho httpd với ạ
Hiện mình chưa nghiên cứu trường hợp Apache này. Bạn tham khảo trên mạng vậy
Trên centos 7 thì lệnh này: service nginx restart
Chuyển thành lệnh này: systemctl start nginx.service
Yeap bạn. Do
service nginx restartgõ trên CentOS7 cũng tự được chuyển rồiĐã ok rồi, thank nhé
Bạn làm thiếu bước nào vậy?
Mình đã làm thành công.
Cám ơn nhiều!
Đã làm nhưng vẫn là OpenSSL 1.0.1e-fips 11 Feb 2013
chứ không phải OpenSSL 1.1.0f 25 May 2017
Bạn make và thay thế thư mục Nginx trong máy rồi restart lại Nginx chưa
Lam roi, ma van khong duoc. Teamview coi giup minh cai nhe
Đã cài Script hocVPS mới nhất + Let’s rồi thì làm từ bước nào đến bước nào vậy anh ?
Làm hết bước 1 là ok nhé!